E-dancing shoes
| Path | Target | Duration | Skills |
|---|---|---|---|
| Curiosity | Teens 16 to 18 | 1,5 h | Electronics, Sewing, 2D Digital Fabrication |
Introduction and context
To build an interactive dancing shoe, two phases are needed : the first part aims to draw and customize the shoe in order to prepare the design for the laser cut. The second part consists in building the circuit, plug the Playtronica and experiment the interactive shoe.
For an initial level, this activity can be developed in a “step by step” format where a kit of materials is provided to each participant with a pre-cut shoe, conductive paper, electric wires and a Playtronica board Touch me.
The duration of this complete activity (building the shoe + electronic circuit) is 2h including a short introduction to electronics concepts, do-it-yourself shoes projects and innovative textile projects.
For a more advanced level, where children have knowledge of digital design, the fabrication of a customized shoe can be considered, for which the use of a laser cutter is also required.
In this case, the duration of the activity is 3h, in order to proceed with the drawing and the laser cutting of it.
The ideal number for each group is 7 kids. One instructor is needed for each group.
Objectives
The activity aims at introducing participants to electronics as part of the interaction between objects and exterior. The purpose of the learning activity is to generate an added value to textile projects.
Learning Outcomes:
- Explore new technologies associated with textiles in a fun and joyful way
- Create a link between innovation and rapid prototyping
- Get introduced to possible projects that can be done with electronics and different type of sensors
Target audience and context of use
Kids, teenagers, families, educators with interest in learning electrical concepts with simple materials just to learn or to apply this knowledge in the classroom in a ludic way.
This activity can be celebrated in different places like museums. Set up a collaboration between your lab, material centers and a cultural center or museum.
The booklets can be printed and given to the participants with the kit of materials.
Recommended number of attendees (7-8) per group and instructor.
Preparation and materials
Dive into the slides of the presentation provided in this page, to create the interactive dancing shoes. Prepare the kits of materials for each participant and also prepare the instructor’s dancing shoe to show it to the participants.
Create your team of facilitators and organize some testing sessions and brief meetings for coordinating with facilitators.
Be careful. Check you have all the tools and materials needed and that you will have time to wrap up your tools, set up the logistics for the event room.
Prepare in advance:
- Electrical components (wires, conductive textile, Playtronica board, multimeter)
- Textile for the shoe
- Material (scissors, pen, paper, ruler…)
Equipment, Tools and Materials
- 1 computer
- 1 video projector to present the documentation
- Tables and chairs
- Electric wires
- Multimeter
- Pen
- Scissors
- Lasercut
- Neoprene textile
- Conductive fabric
- Board Playtronica Touch me
- Paper
- Tape
Step by Step Instructions
STEP BY STEP overview
- Draw the shape of the feet onto paper and cut it with scissors.
- Test the material’s conductivity with the multimeter.
- With the help of the paper pattern sole, cut 2 soles with conductive textile and one with neoprene.
- Cut some holes in the neoprene one.
- Draw the shape of the dancing shoe.
- Prototype first with paper and scissors.
- Don’t forget the notches ! How to attach the shoe
- Take a picture of the shoe. With the help of a facilitator, vectorize the drawing with a vector software.
- Laser cut the shoe with the help of a facilitator or cut it with scissors.
- Insert the notches to assemble the shoe.
- Create a sandwich with the neoprene sole in between the two conductive soles.
- Insert the soles into the shoe.
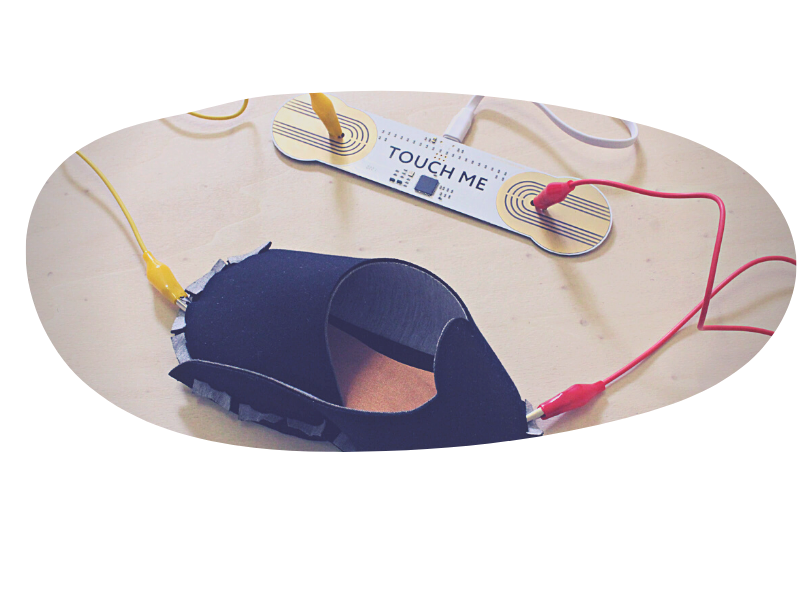
- Plug the first wire on the top conductive sole and connect it with one side of Playtronica.
- Plug the second wire on the bottom conductive sole and connect it with the other side of the Playtronica.
- It’s ready !
Safety rules & Tips
- A facilitator should help with the vectorization of the drawings and the laser cut.
Presentation for the class
Flyer for participants
Tips to facilitate the activity in context (to-do / not do)
- Prepare the room in advance.
- Create your team of facilitators and organize some testing sessions and brief meetings for coordinating with facilitators.
- For the better understanding of the activity, it is recommended to have samples of each part.
- It is recommended to make paper prototypes before making the textile shoe.
Estimated cost
You might plan some costs for getting the materials and tools but also some fees linked to your collaboration with the place you run the workshop.
| Name | Quantity | Links | Cost/quantity |
|---|---|---|---|
| Playtronica board Touch me | 1 | Playtronica | 60€ |
| Electric wires | 2 | Playtronica | 9€ |
| Conductive fabric | 1m | Amazon | 19€ |
| Textile : neoprene, skai (no PVC!) | 3m | Local shop | 20€ |
References
Fabricademy E-textile & Wearables Classes Liza Stark - The soft circuiter Jessica Stanley - E-synth
Links to photos and recorded materials
Licence and credits

Attribution — ShareAlike CC BY-SA This activity has been designed by Pauline Gamore for shemakes.eu. It is based on Fabricademy´s learning content of e-textiles and wearables.
Related and supporting activities/modules
It can be combined with the other topics within the Wearable Technology Package of Fabricademy, such as Wearables.