The little wool factory
The "Little Wool Factory" is situating the overall wool process mapping and add practices ranging from large scale industries to small scale independent initiatives to better understand the required equipment and ideate on how it can be reproduced with digital fabrication equipment, providing blueprints and tutorials on assembling open source tools and machines for setting up small scale wool microfactories.
This experimentation, building and learning moment is an important step towards building DIY machines that can handle small wool quantities to be tested and feeds the replicability of the tools for the labs and the lab-to-lab projects.
What has been done until here?
Collection of tools
After personal on-site research at the Icelandic Wool Factory, Alafoss in 2019, FarmLab Visit in Austria 2019, Wool Initiative at Basque country 2021, we could better comprehend the steps required and infrastructures needed for creating a Little Wool Factory, from sorting Wool and cleaning the debris, washing, storing, wool picking, wool carding, Spinning for yarns, felting for non wovens. Then, looking at DIY practices, tools were identified especially for the most common making phase for textile designers, i-e from spinning to looming and knitting. Some of them have already been tested in the Fabricademy community like The Hilo spinning machine, or the loom from the Be grounded project, the fabloom project among others. There is a specific week in Fabricademy that invite students to learning about those specific machines and working on re-developing or hacking them. Apart from those steps, a wide range of tools has been created for agriculture purposes that could be applied in the early stage of the process of wool collection. Websites and open source platforms such as Wikifactory, Open source ecology, or ifixit could help to find the right documentation. An original project, from Fabricademy Alumna Sofia Guridi, (FILT) has created a machine for felting shredded textile waste and thus focusing on facilitating the end of life of the process. Partners identified that the DIY version of one relevant tool was missing on the process: the carding machine.
Learning activities with wool tool making
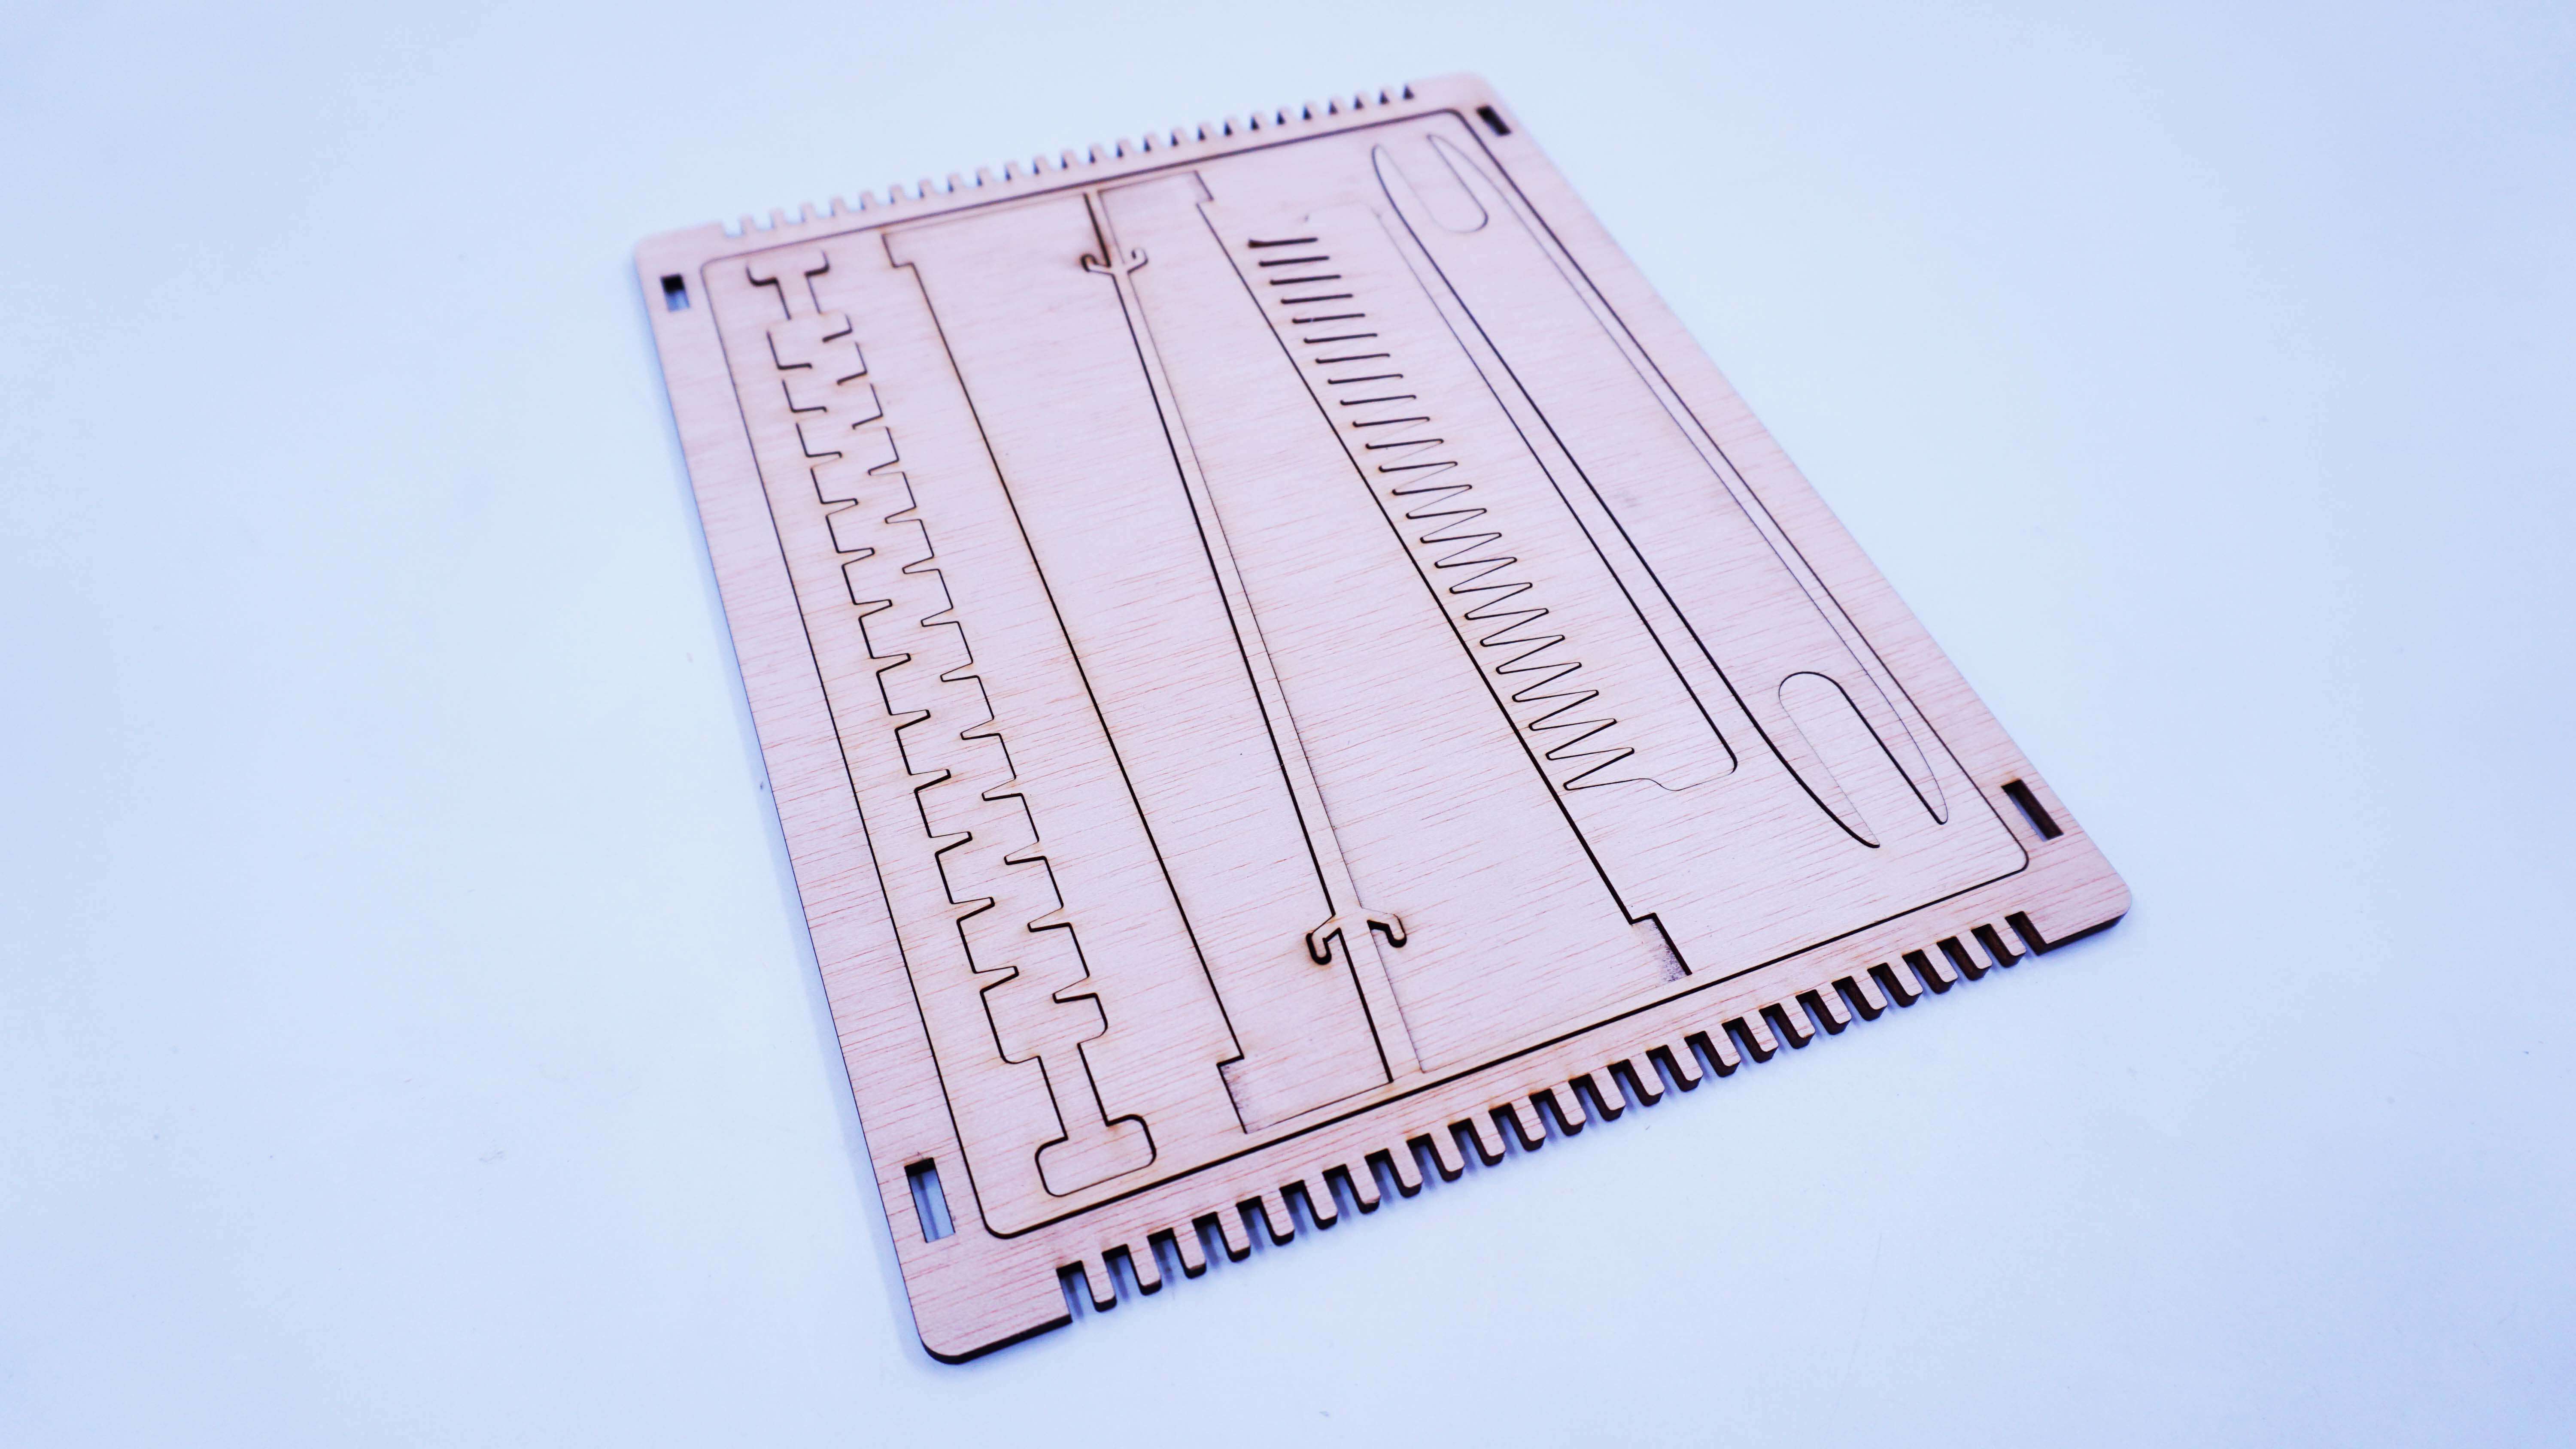
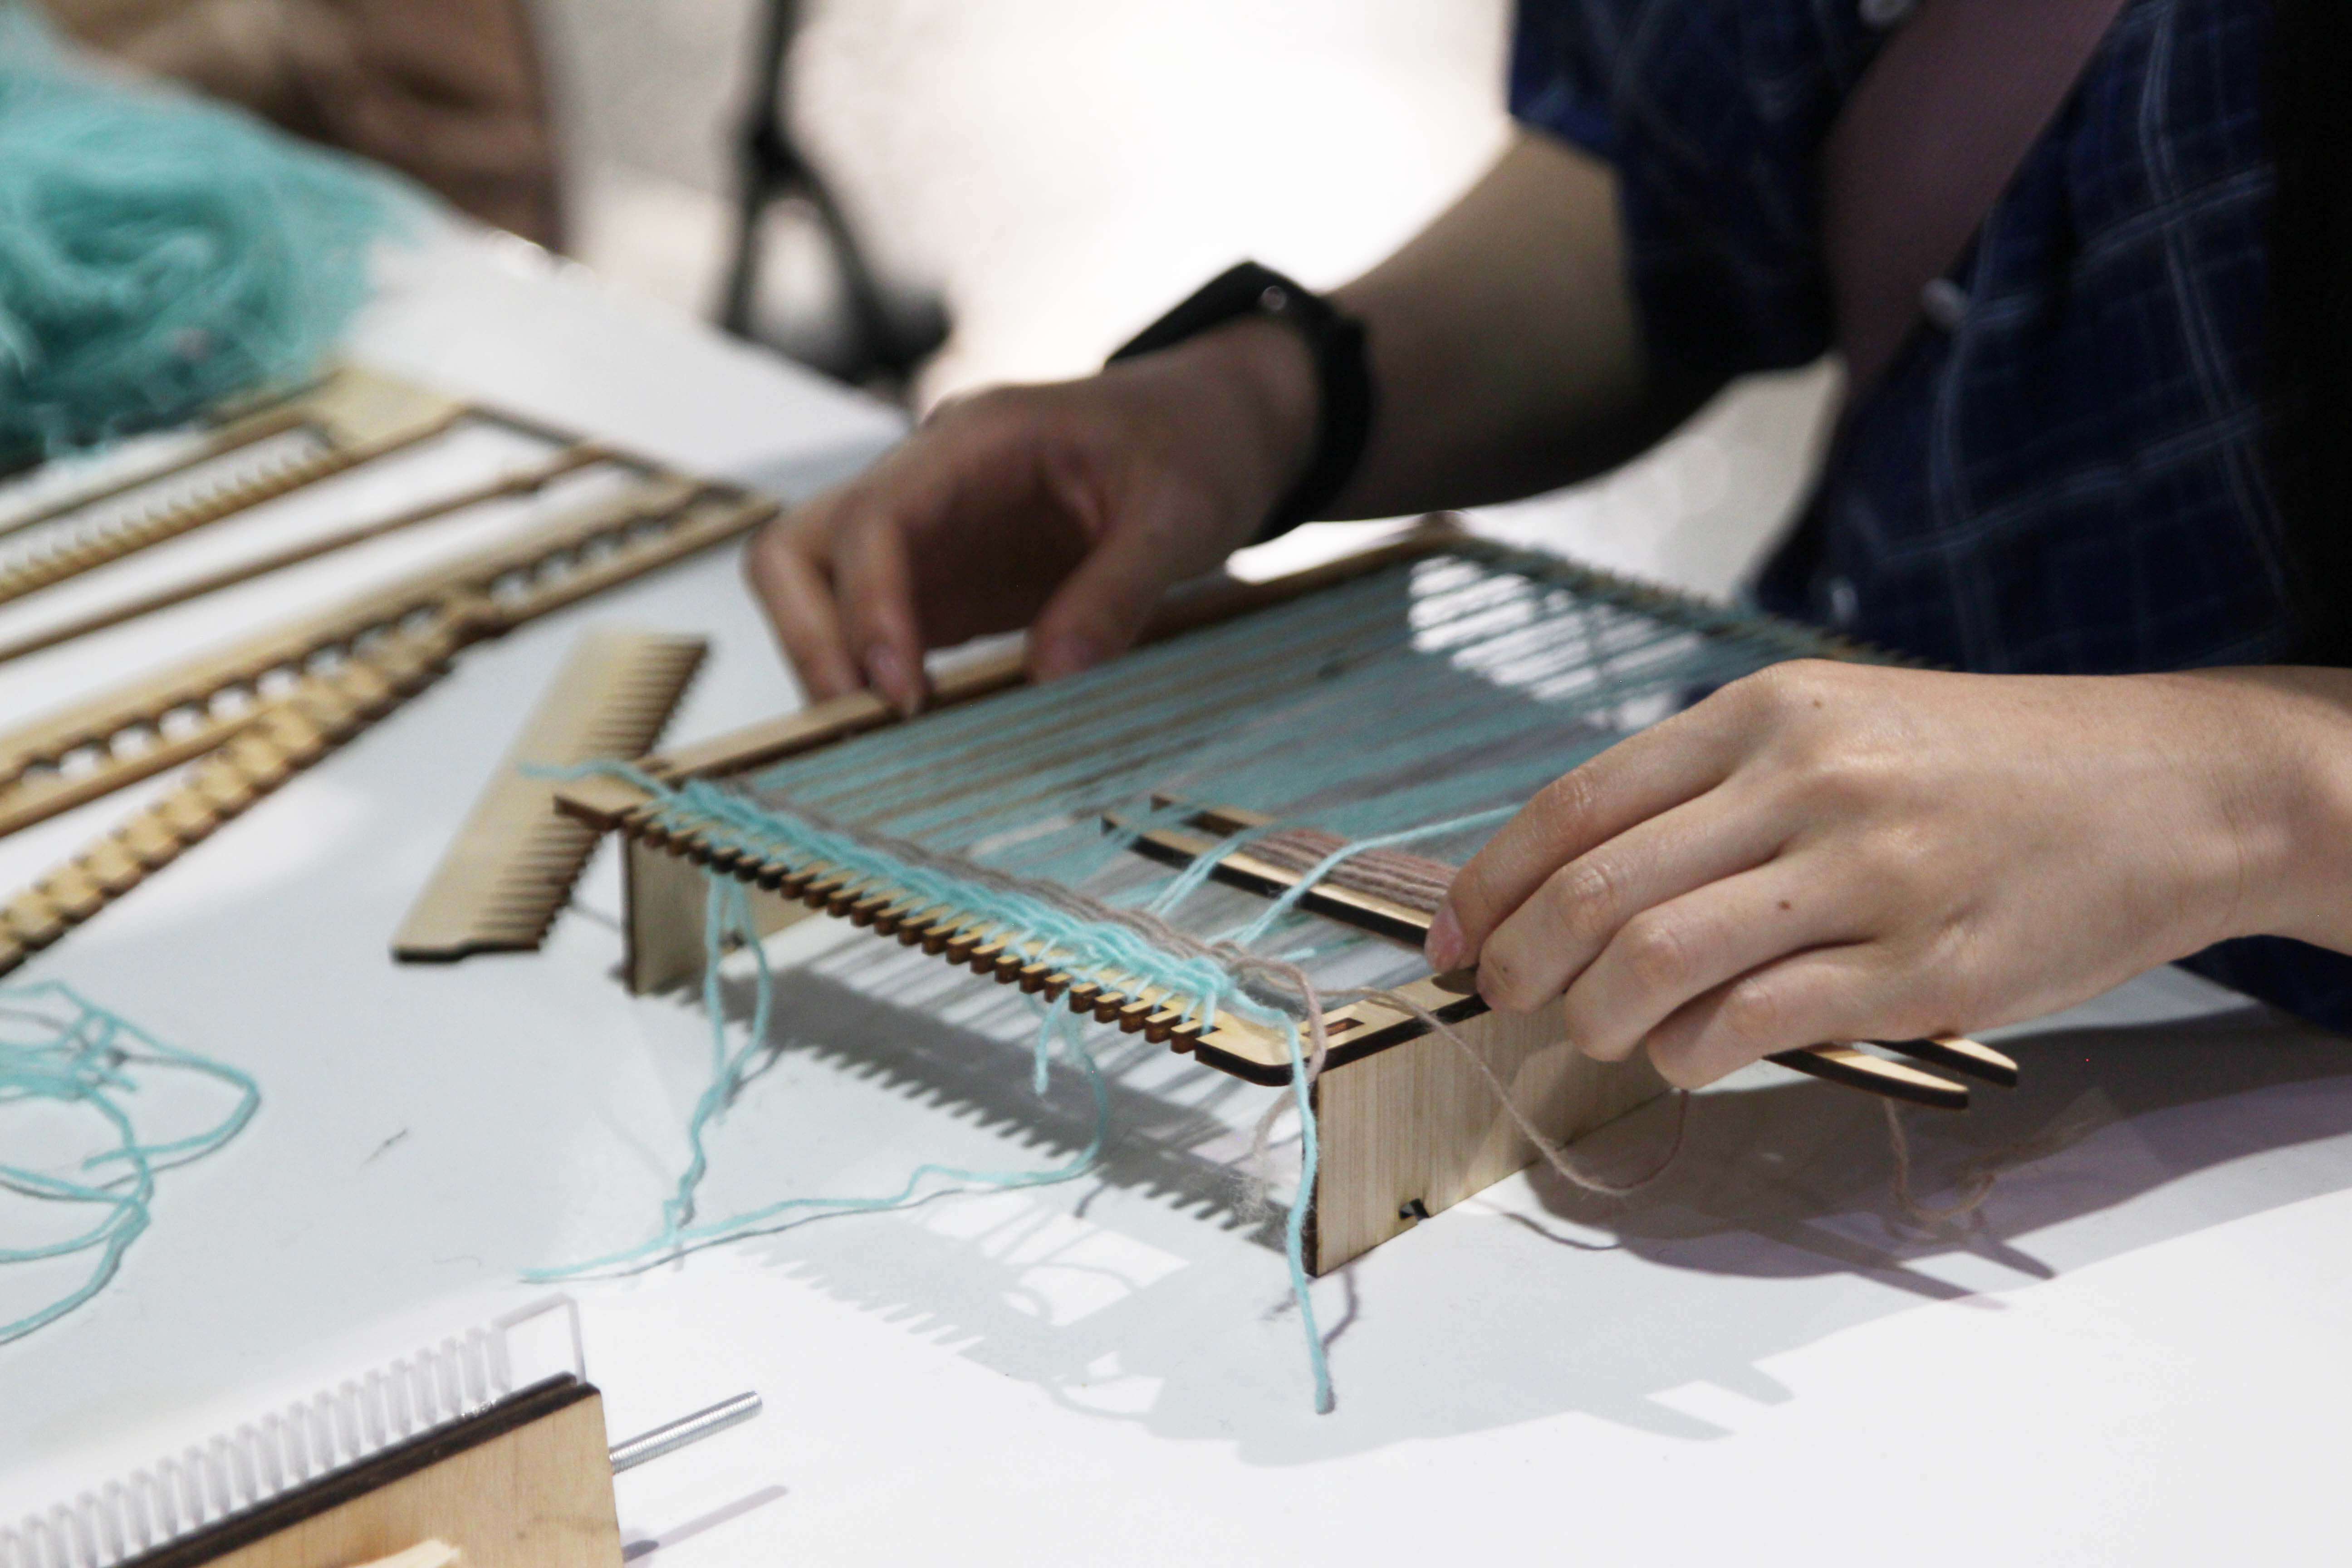
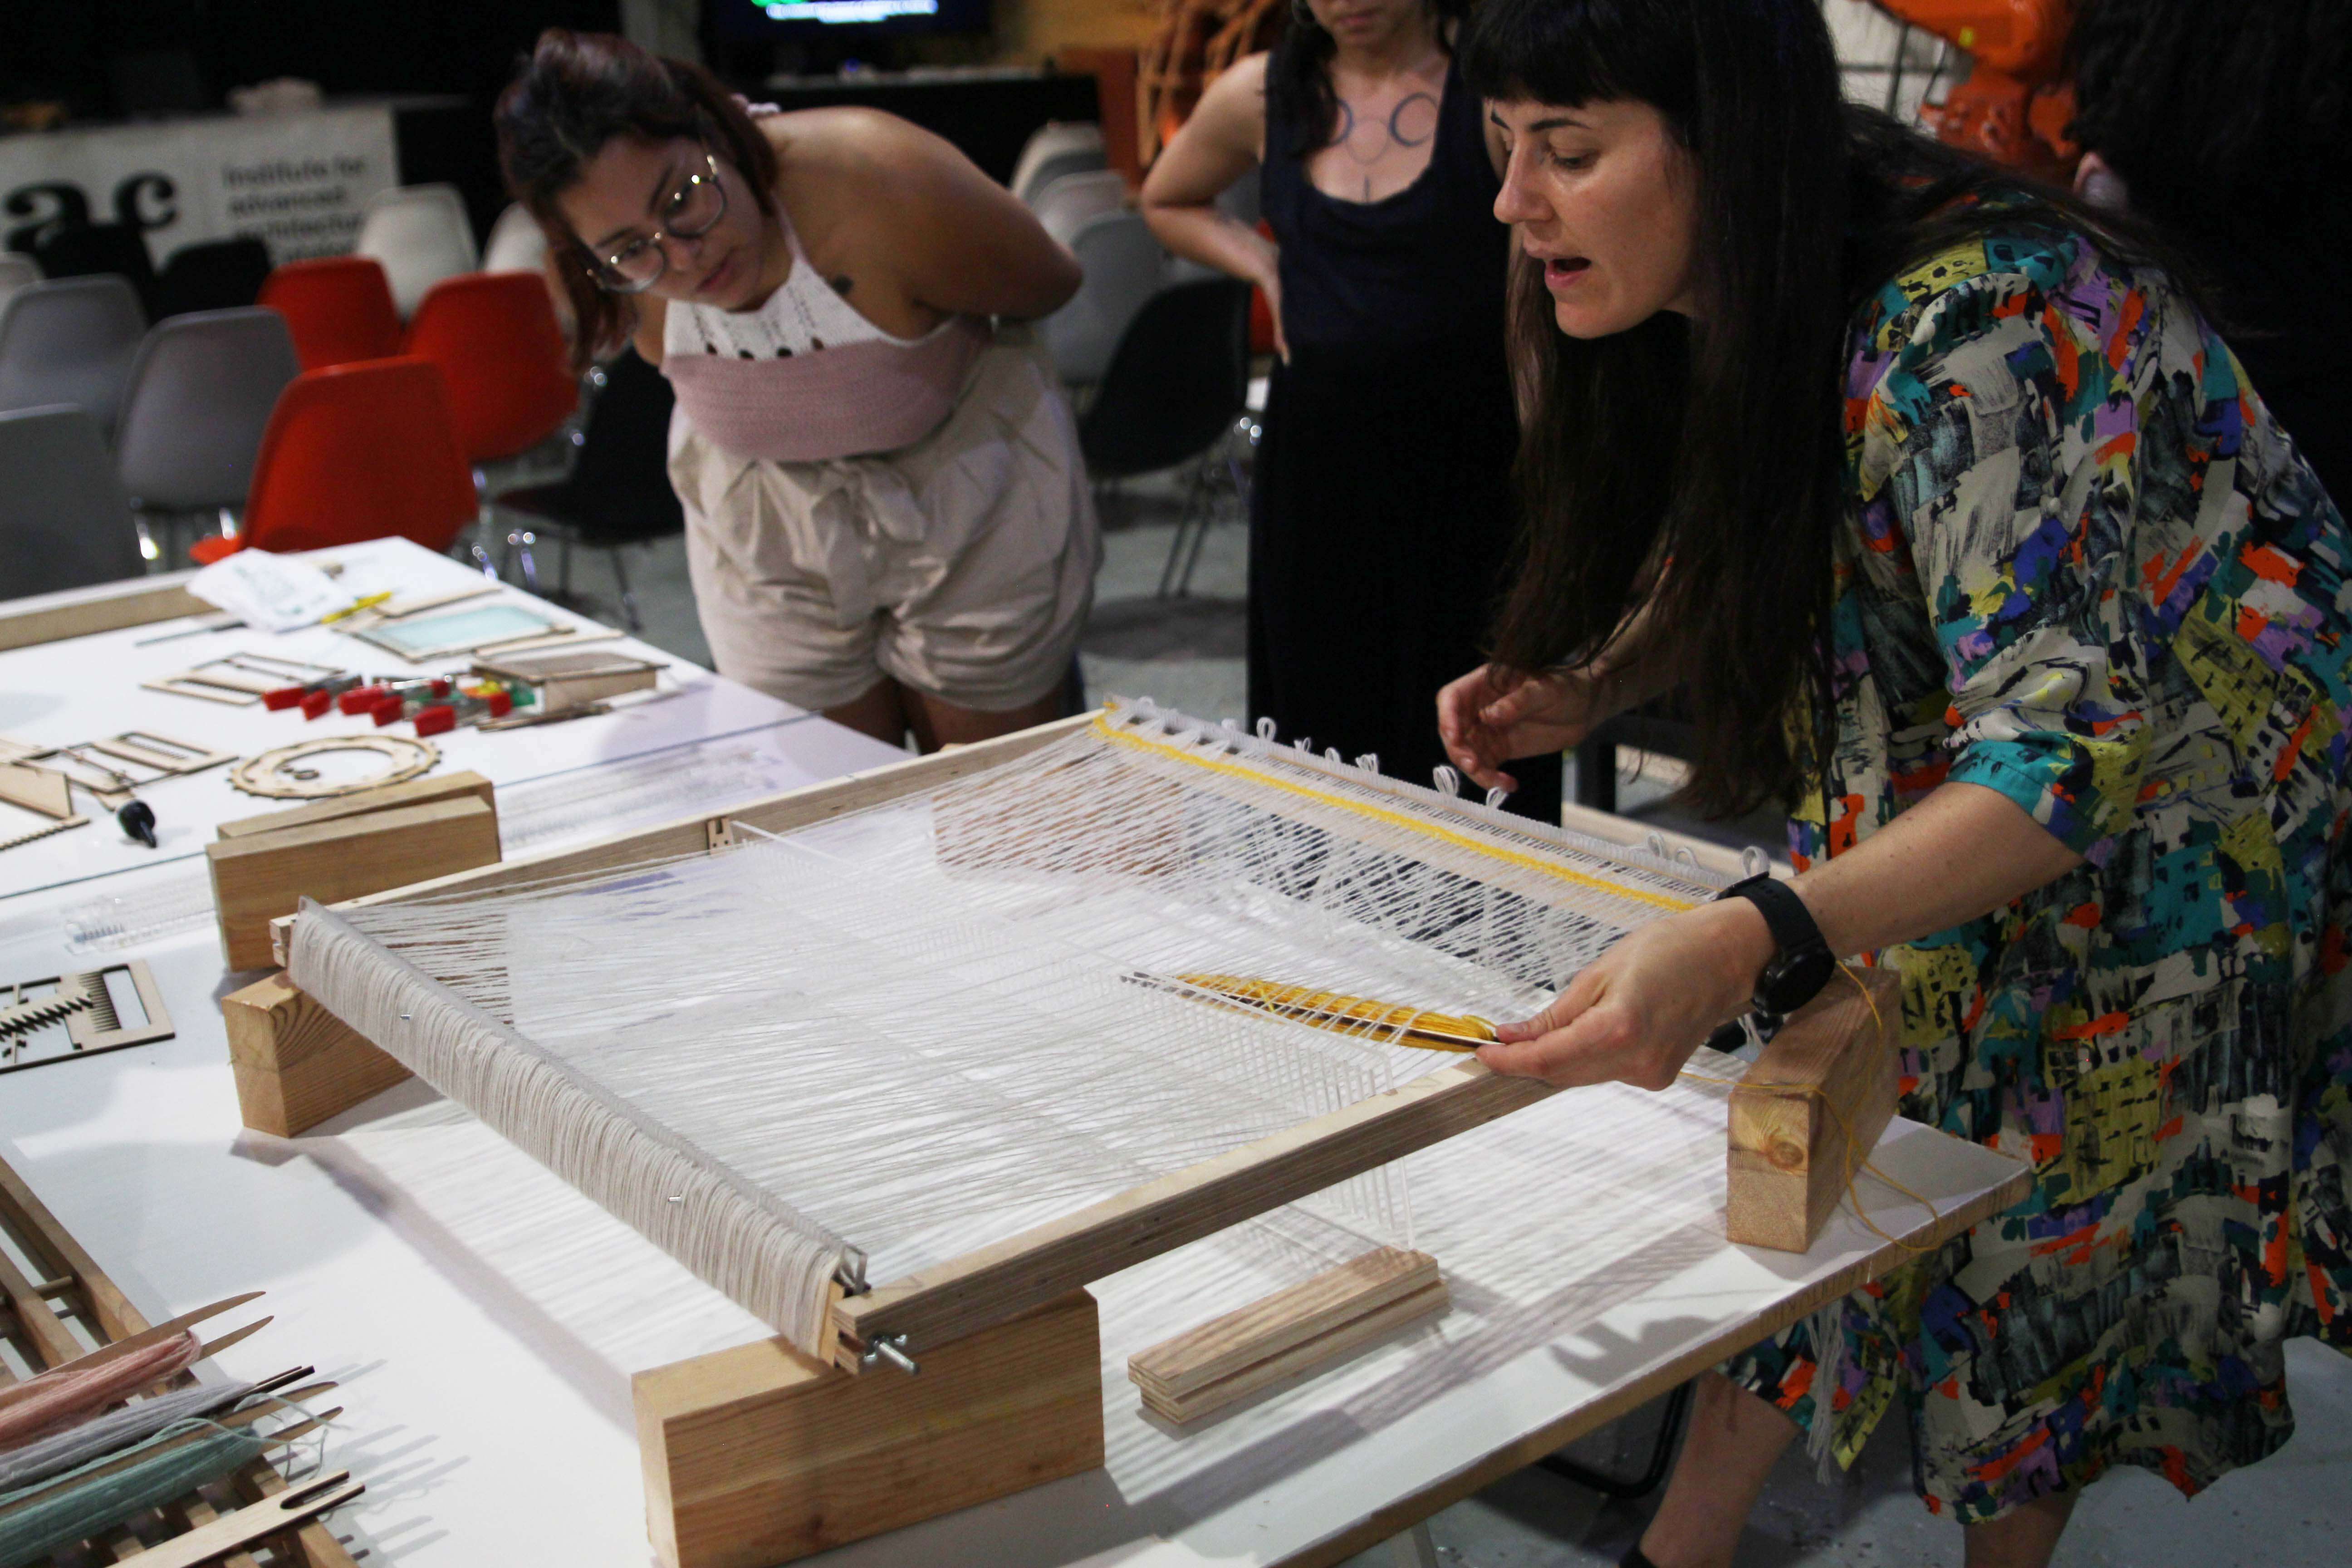
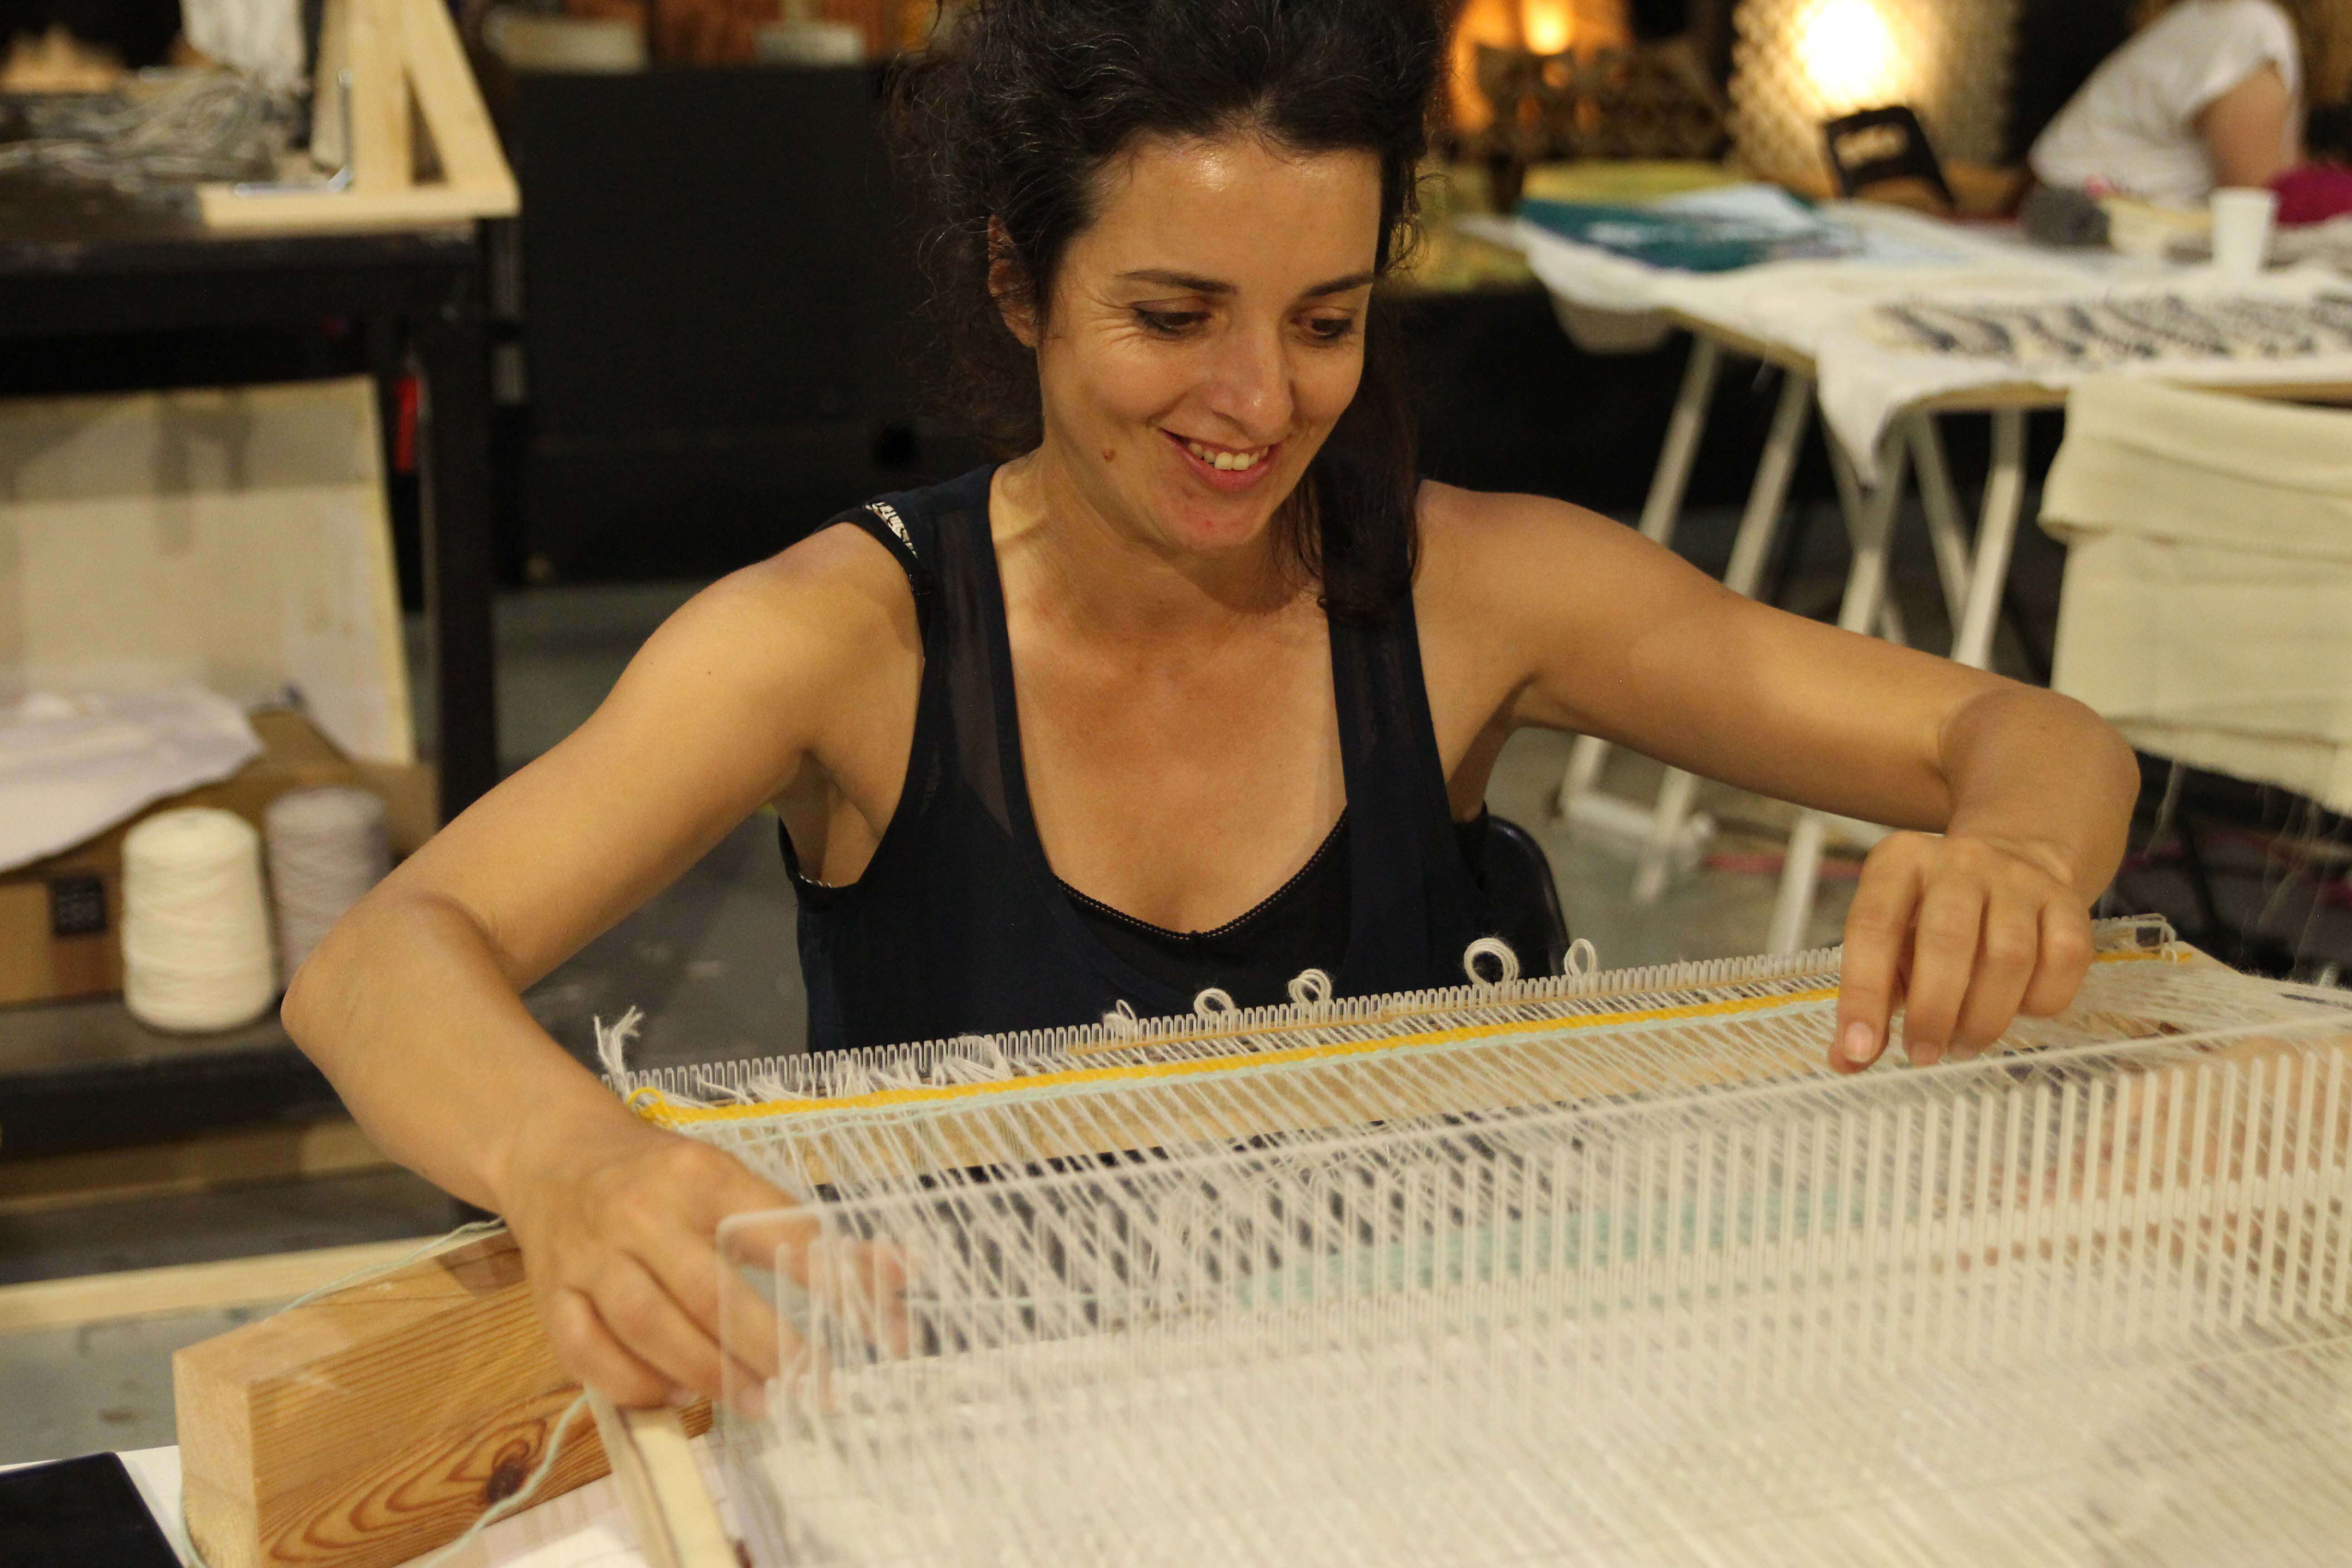
- Applying and replicating existing tutorials: For the Rewool discovery workshop, Redu worked closely with IAAC to successfully replicate a number of digitally fabricated tools (spinning and weaving tools) coming from the Fabricademy research portfolio and open source fabrication files. They were built by the researchers and used in the event to weave and spin single strains of wool.
Get to know more here)
- Open source Hard Week at Fabricademy 2021: Students have explored and assembled the new Hilo machine.
Get to know more here
Making and assembling tools
- Assembling a DIY carding tool and accessories:
The first tools created are a DIY carding/blending tool and a hand spindle. These were created by the Amsterdam University of Applied Science, tested and experimented upon during the Local BioChromes workshop held in August 2021. Experimentation started with a DIY carding cloth and brush, to experiment together and teach others how to card wool fleece and how to mix (also defined as blend) the naturally dyed dutch wool, creating a new range of carded wool colours. After the carding tool, experimentation was brought one step further with a DIY hand spindle, to learn and teach how wool is spun by hand. This has been explored deeper by Shannon from Onlfait.
From the overview created by tool mapping and first experimentations, the remaining strategy relies on identifying which tools are interesting for a DIY reproduction, why and what is possible to do in the timeframe of the shemakes.eu project. Working with connected labs to design and replicate will extend those first experiments and extend the perimeter of the Little Wool Factory and the usability of the small household scale machines and at the same time promote the use of shared infrastructures (fablabs) for engaging with communities interested in wool craft; engaging women in making and using the machines.
THE LITTLE WOOL FACTORY Presentation
Let's build our Matrix of tools
Matrix of tools
| Type of tools | files and webs |
|---|---|
| Carding | Drum Carder by Farmlab, Cardo project |
| Spinning | DIY drop spindle V1, Hilo studio 3 |
| Weaving | Small Loom, Medium Loom, [Large Loom] (https://drive.google.com/drive/folders/1-Ly8uPWsXrfUfGGqjNDnsjJDAeI4-dw6?usp=sharing) |
| Knitting | Open Knit Machine |
| Felting | Felting by Hand, felting with soap, DIY Felt machine |
| Tufting | |
| Upcycling | Rope-Making by Sanne Visser FILT |
Carding machines
- Tutorial on how to use a carding drum
File of the machine designed by the Farm Lab Drum Carder by Farmlab
Other ressources: Cardo project tuto Link1 Link2
Rope Making machine
This machine consists in a Rope-making machine.
The research has been initiated, documented and tested by Sanne Visser for the shemakes project. Main references can be found here
How to
- 8 x 608ZZ bearings
- 4 x 10mm spacer 6mm inside 608 long sleeve bearing spacers
- 4 x T nuts M6
- 10 x screws 20mm long No.4
- 4 x M6 screw hook bolts, length 5cm
- 4 x t nuts M6
- 8 x washer M6 small
- 4 x washer M6 large
- 4 x lock nuts M6
- 3 x M5 round head allen hex socket, length 30mm
- 3 x lock nuts M5
- 8mm screw hub (RB-Nex-18)
- 4 x 608ZZ bearings
- 6 x M6 round head allen hex socket, length 25mm
- 8mm screw hub linear
- 8mm bright bar shaft
- shaft lock collar 8mm
- 2 x M4 round head allen hex socket, length 30mm
- 2 x lock nuts M4
- 7 x lock nuts M6
- 1 x M6 round head allen hex socket, length 45mm
- 3 x M6 washers small
- 4 x threaded insert nuts M6, length 10mm
- 1 x spacer 6mm
- 4 x threaded insert nuts M6, length 10mm
- 8 x hex socket countersunk screws  -
- DC 24V 75 RPM 8mm Dia Shaft Magnetic Gearbox Electric Motor 37mm
- Gearbox
- Remote 12V 3A DC Motor Speed Controller
- 8 x 3" (75mm) Butt Hinges
- 48 screws 12mm length No.4
- 4 x M6 round head allen hex socket, length 17mm
- 4 x M6 washers
- 4 x M6 lock nuts
- 4 x hexagon bolt M4, length 30mm
- 4 x M4 lock nuts
- Eye plate ring hook staple 45 x 15 x 20 mm
- SHF10 Horizontal Linear Shaft Holder
- 7.5cm 8mm shaft
- Gather the pieces
- Download the [dfx file](https://drive.google.com/file/d/19tKuJ6-5roUWfHBDs8tTCqEqPnUujVN-/view?usp=sharing), choose the relevant version and cut the pieces
- Assembly all
- Check if it looks like as the following pictures
Spinning
####DIY Spindle Machine 1
This machine consists of spinning carded wool with a DIY spindle that can be foldable and be taken everwhere you go.
The research has been initiated by Loos, documented by Shannon Sykes tested Shannon Sykes by the community that assited Fab16 for the shemakes project. Main references can be found here: link
!!! example "How to"
    === "Materials"
        - Cd
        - Wooden pole 15mm diameter
        - 2 rubber rings
        - Eye lag or thick metal wire (2mm)

    === "Preparations"
        - Cut the wooden pole to be 300mm
        - Make a hole of the size of the wire and 10mm in depth on the top of the pole
        - Cut 30mm of metal wire
        - Bend the metar wire into a hook

    === "Assembly"
        - Screw the metal hook in the hole on the top of the pole
        - Add one rubber ring at 100mm of the top from the bottom
        - Then the CD
        - Then the other the rubber ring to fix the CD in place

* Next steps to improve it?
3d printed Spindle Machine 2
This machine consists of spinning carded wool with a DIY spindle that can be foldable and be taken everwhere you go.
The research has been initiated by Loes Bogers, documented by Shannon Sykes,tested Shannon Sykes by the community that assited Fab16 for the shemakes project. Main references can be found here: link
!!! example "How to"
    === "Materials"
        - wooden dowels 15mm Ø
        - Eye lag or metal wire (2mm)

    === "Tools"
        - 3D printer
        - drill
        - saw

    === "Preparations
        - 3D print whorl
        - Cut the wooden pole to be 300mm
        - Make a hole of the size of the wire and 10 mm in depth on the top of the pole
        - Cut 30mm of metal wire
        - Bend the metal wire into a hook.

    === "Assembly"
        - Put on the 3d print whorl at 100 mm from the top of the wooden dowels
        - Screw the metal hook in the hole on the top of the pole
Make the whole of the 3d printer slightly bigger because wooden pole bought are always exactly 15mm and the 3d print doesn't stretch
Hilo Machine 3.0
This machine consists in spinning !
The research has been initiated by the studio HILO, tested by different labs for the shemakes project during the Fabricademy course (Green Fabric, Fab Lab Barcelona, Waag...).
Main references can be found here: link HILO SPINNING MACHINE 3.0 FILES
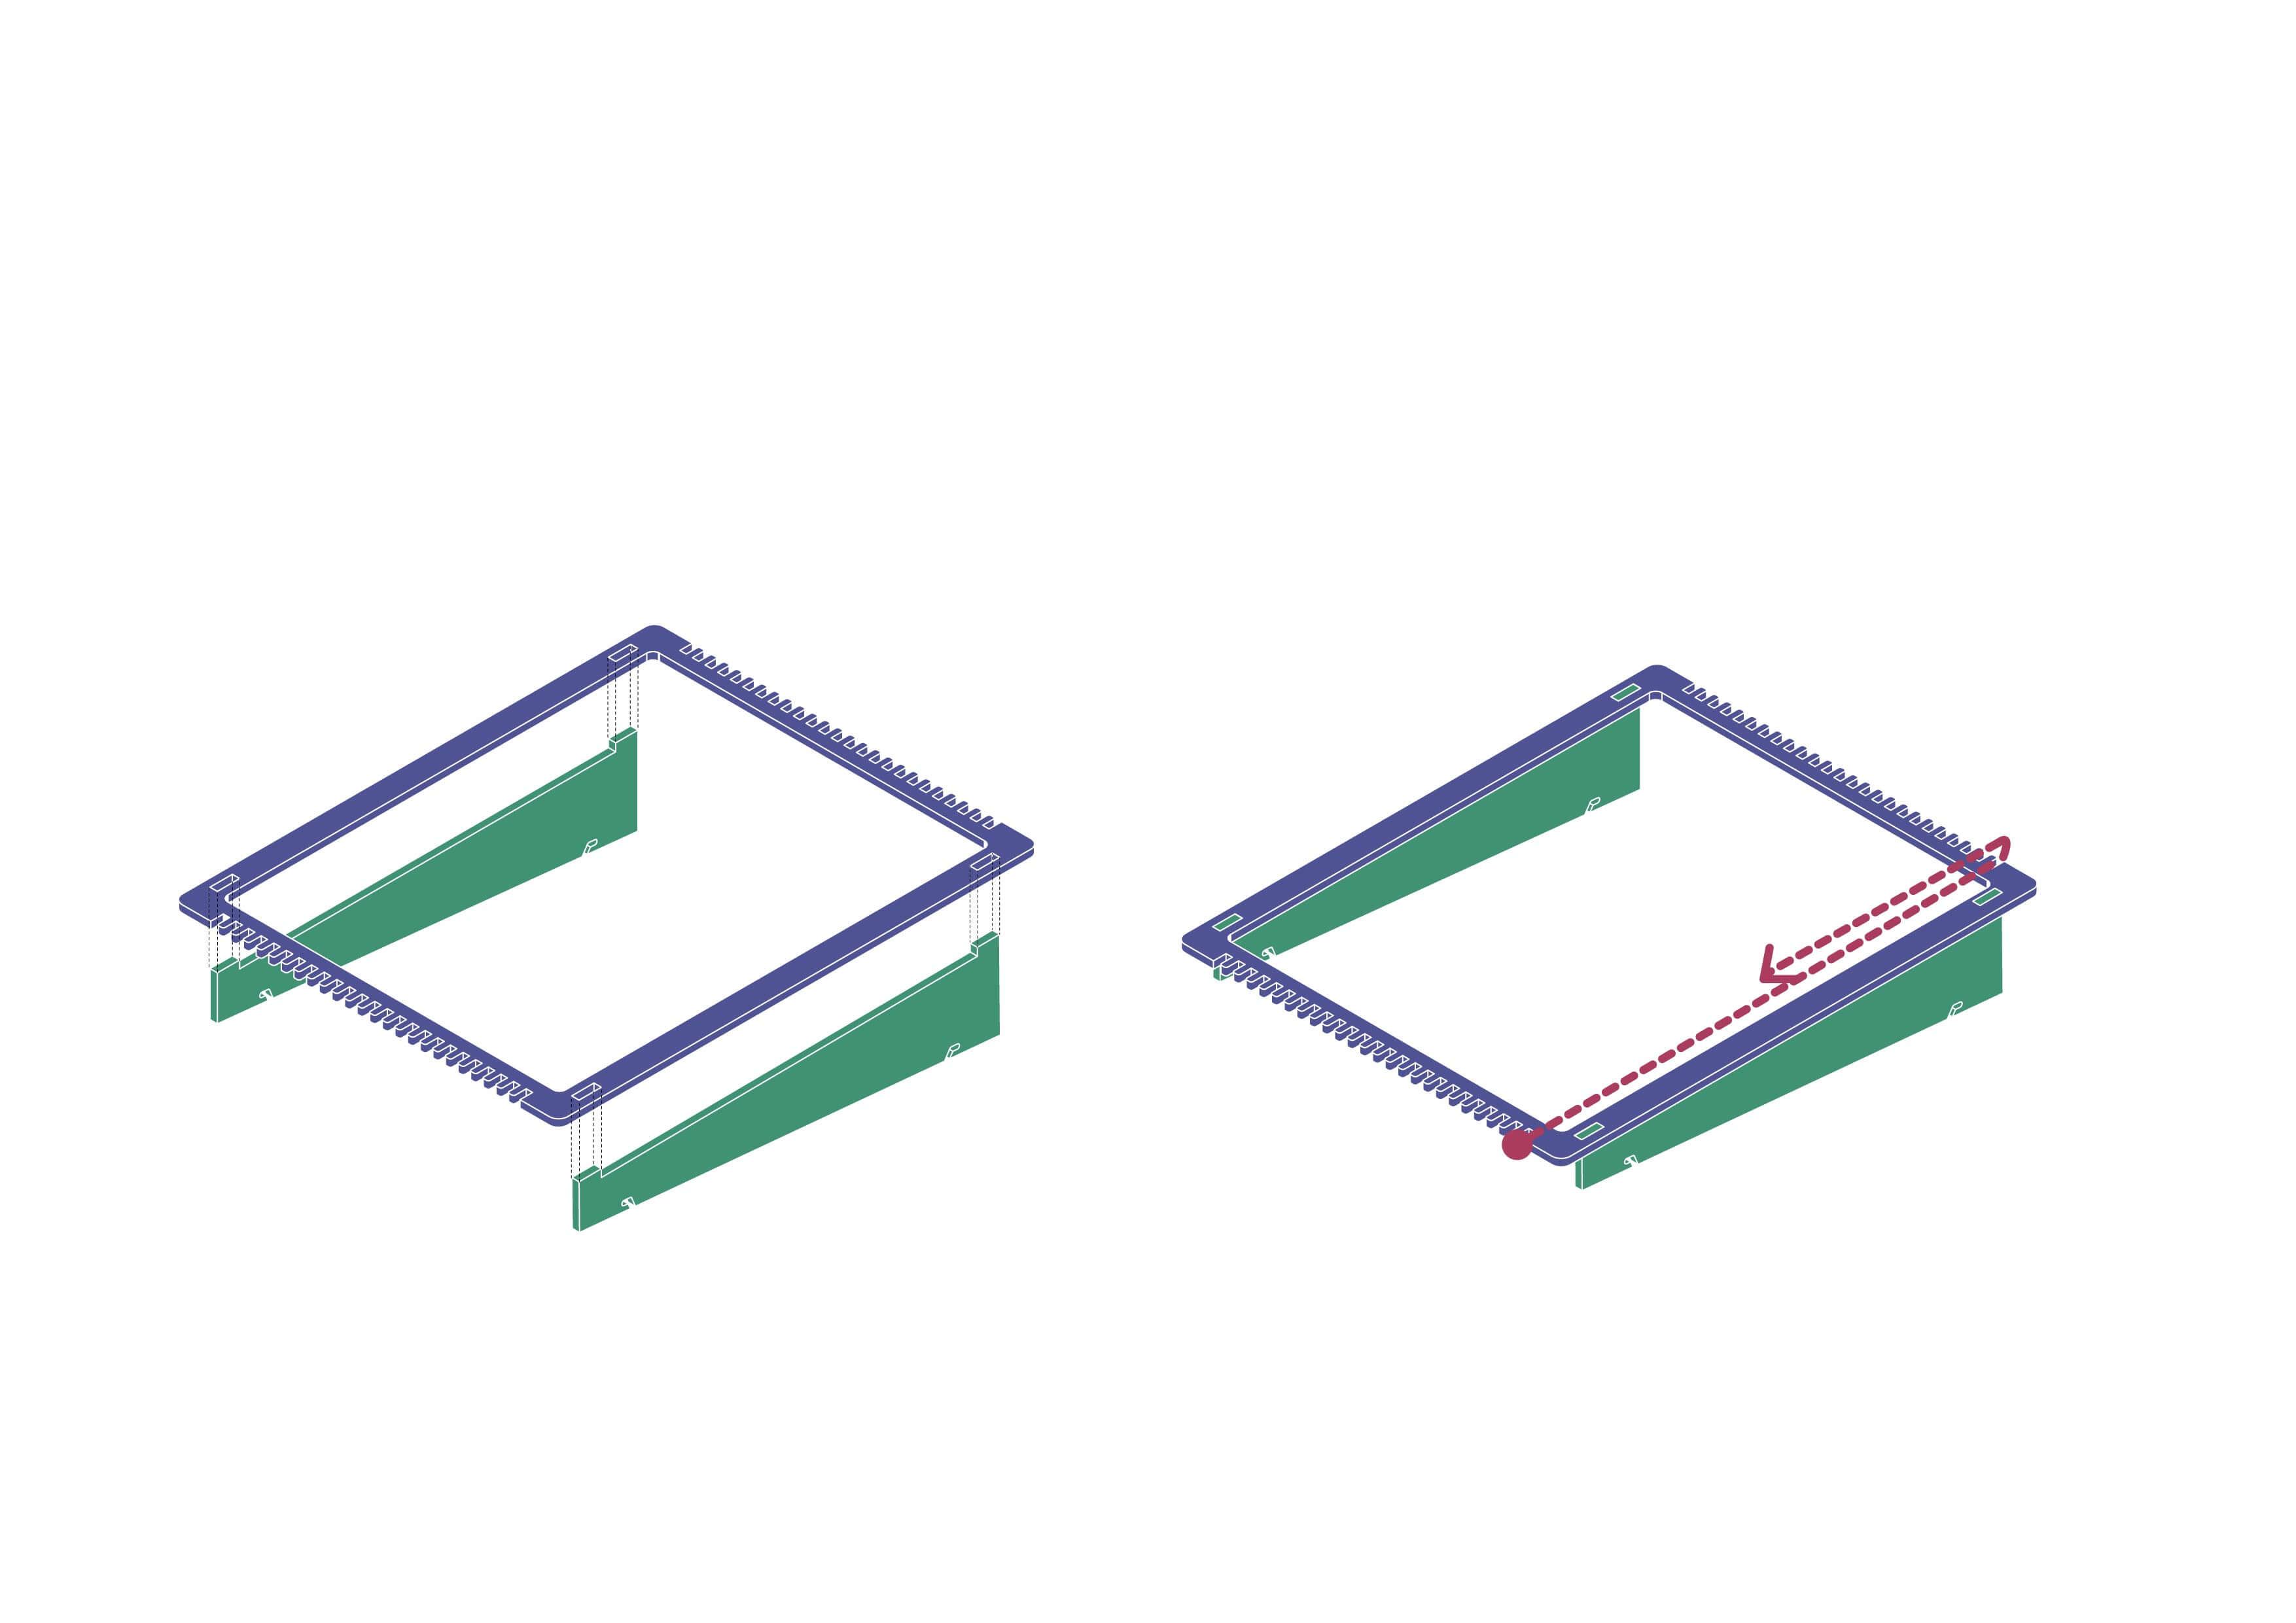
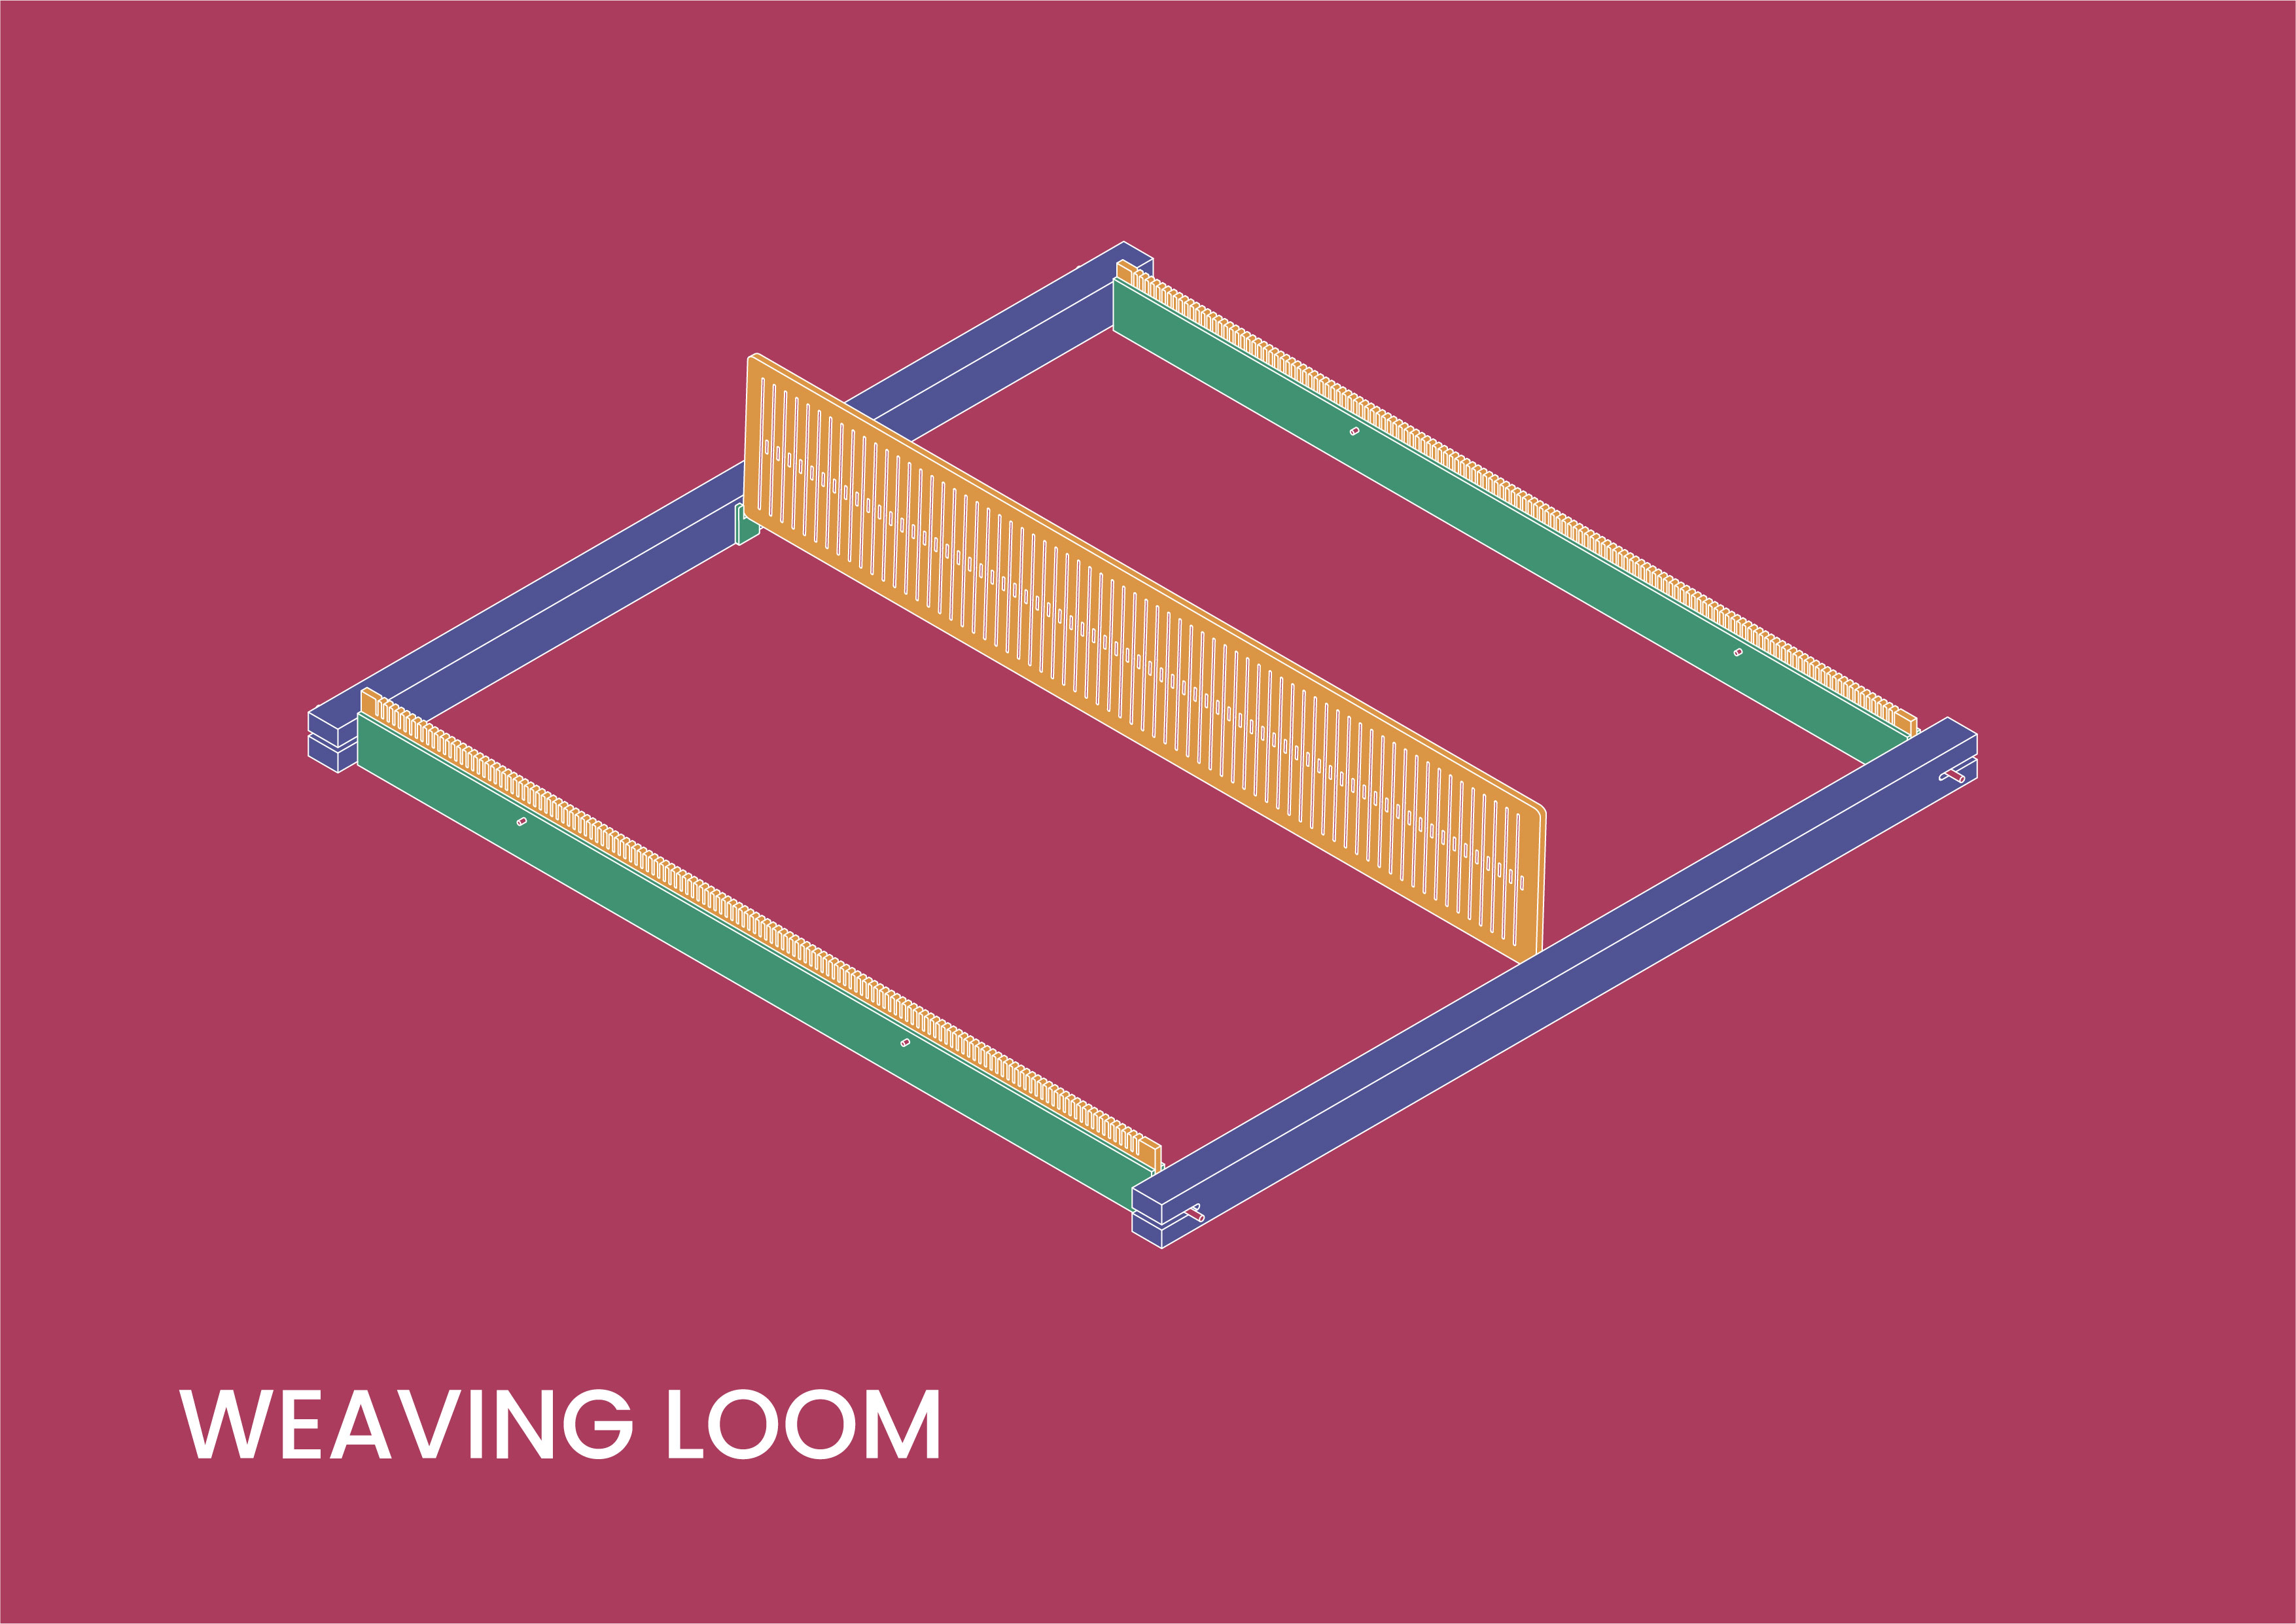
Weaving
In this section we briefly mention some basic concepts and facts about weaving and accompany it with some references for further reading. The basic vocabulary for weaving: - Warp - Weft - Basket Weave - Beater

^WARP & WEFT, By Alfred Barlow, Ryj, PKM - Adapted from The History and Principles of Weaving by Hand and by Power by , 1878, S. Low, Marston, Searle & Rivington, London., CC BY-SA 3.0 https://commons.wikimedia.org/w/index.php?curid=94725908^
Looms
In a nutchell, the whole history of computing is based on the first automated loom!, invented by Joseph Marie Jacquard, from Lyon, France. But, let's go a little bit backwards, because this happened only in 1801. Before that there is a tremendous history in weaving, even dinosaurs were weaving to make plant braces for their teeth.
References: Link1 link2 link3 24-Bit Friendship Loom
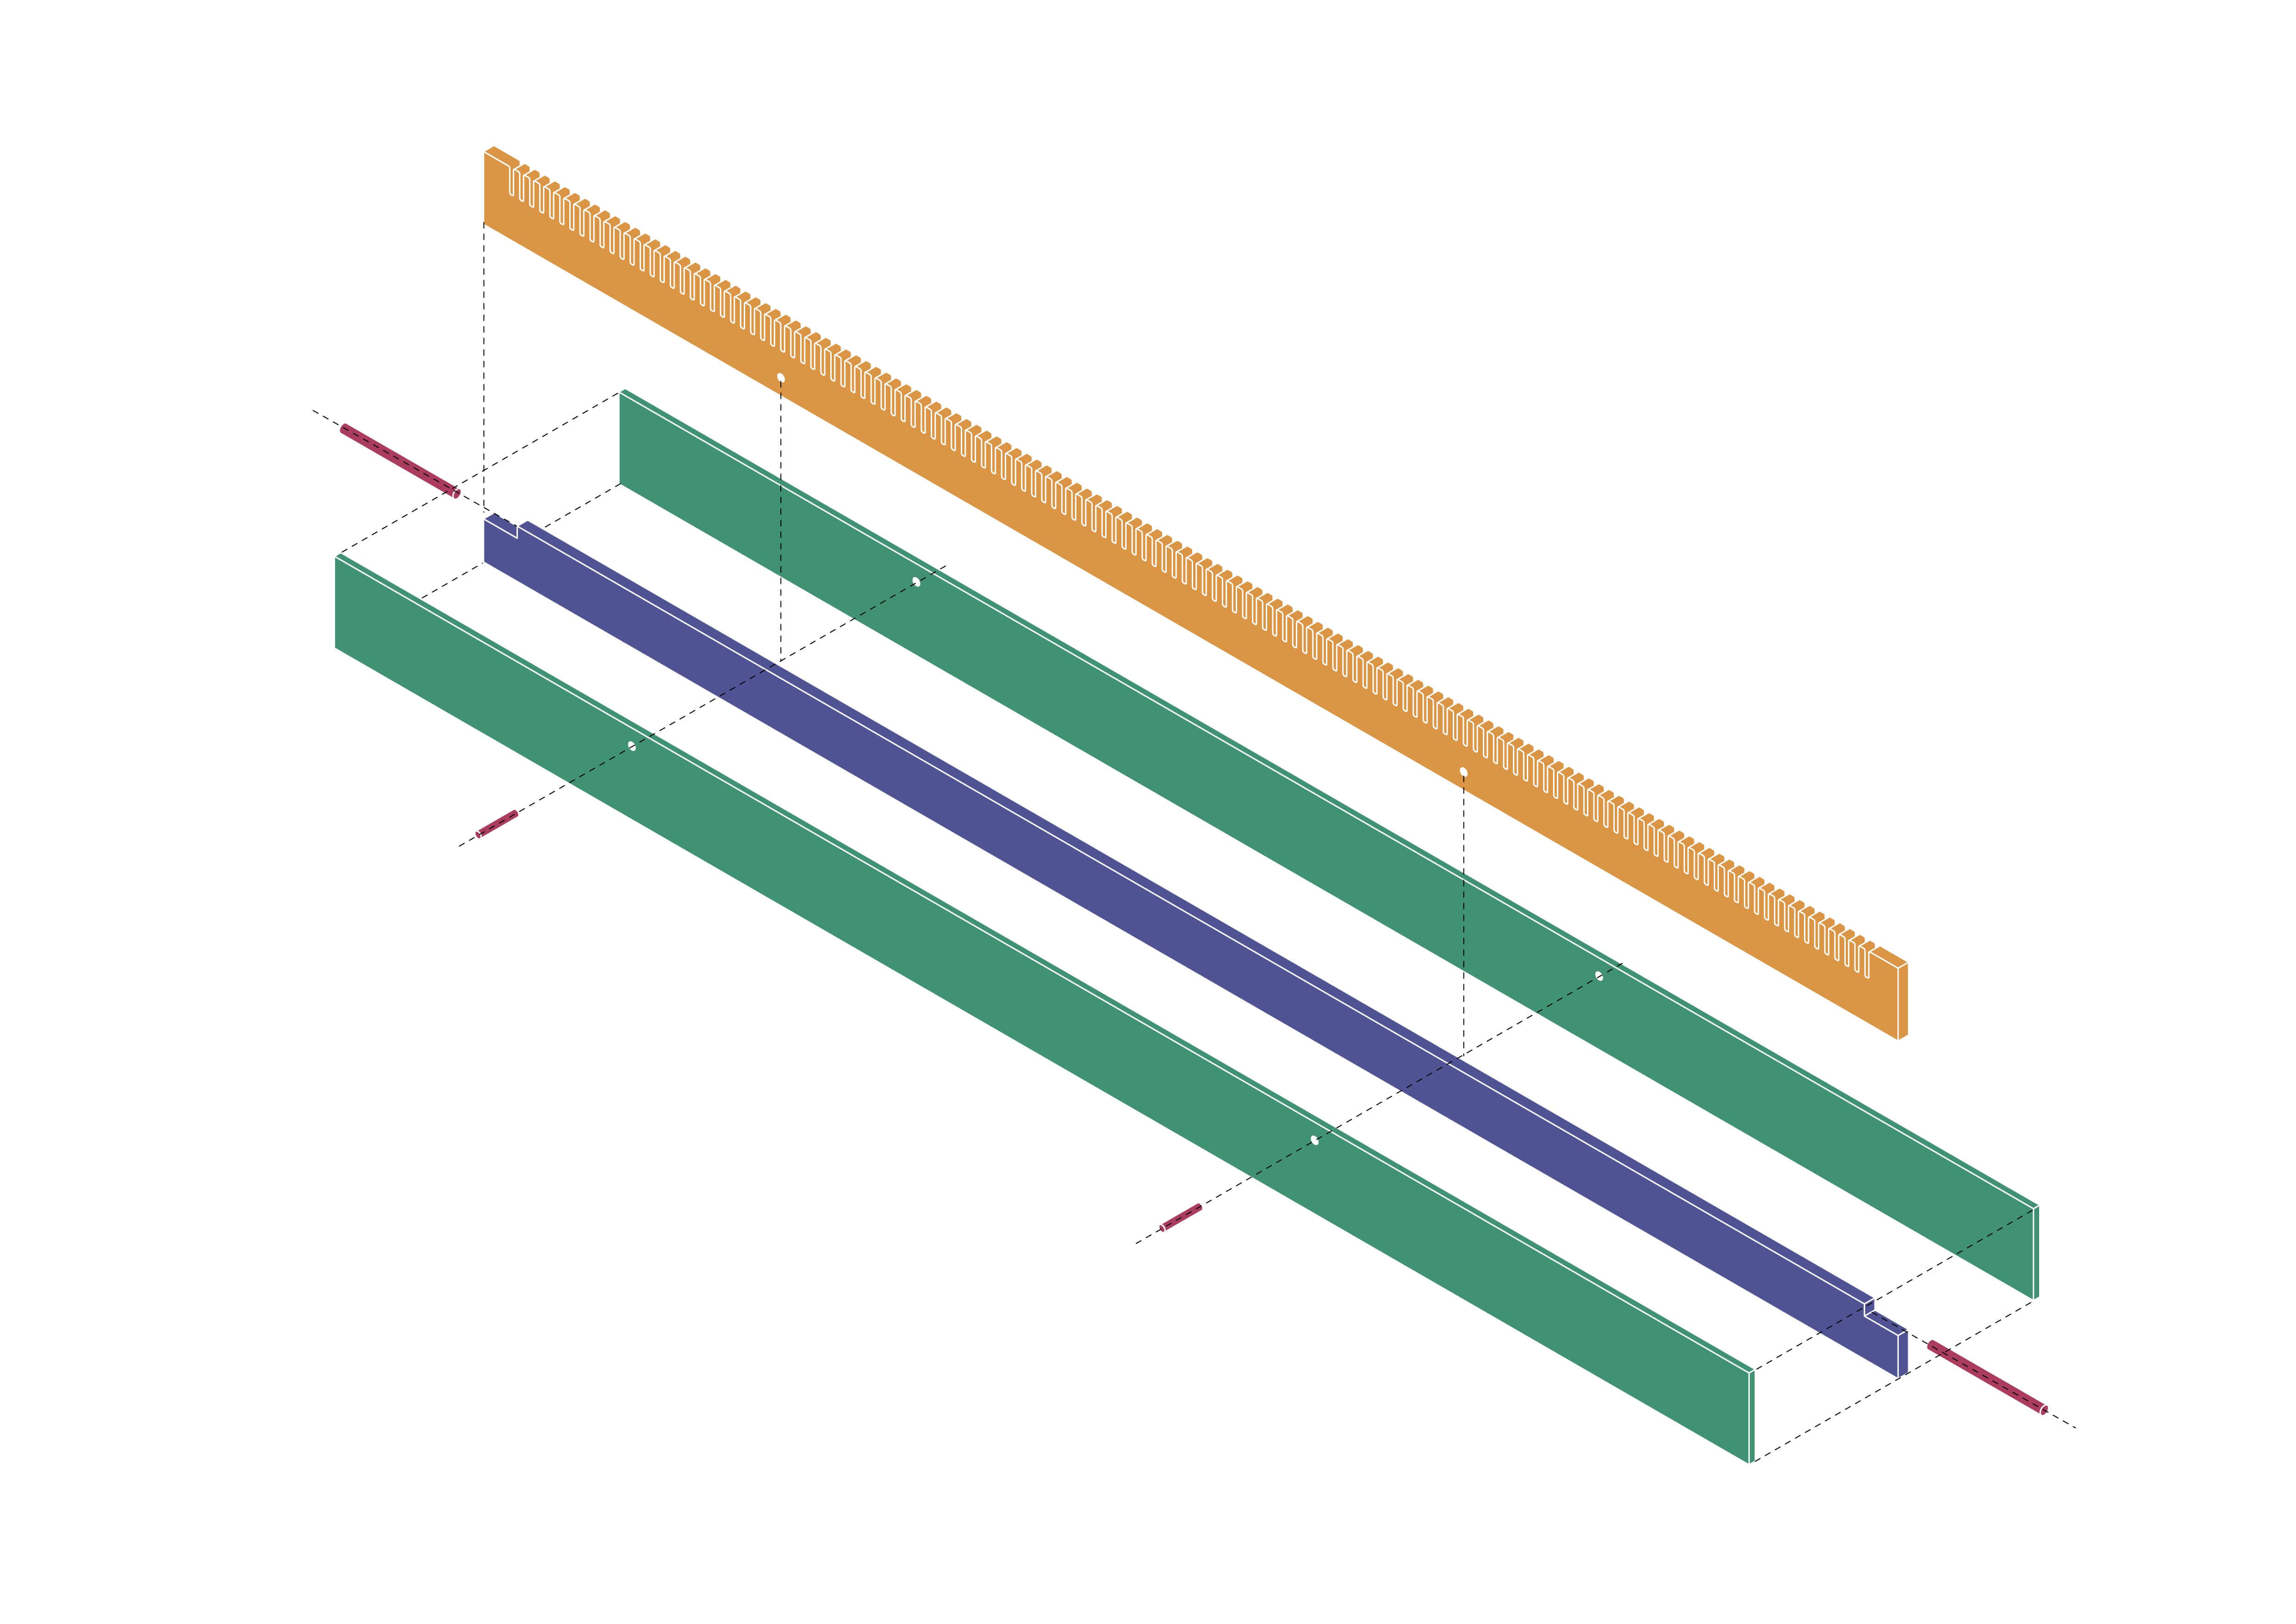
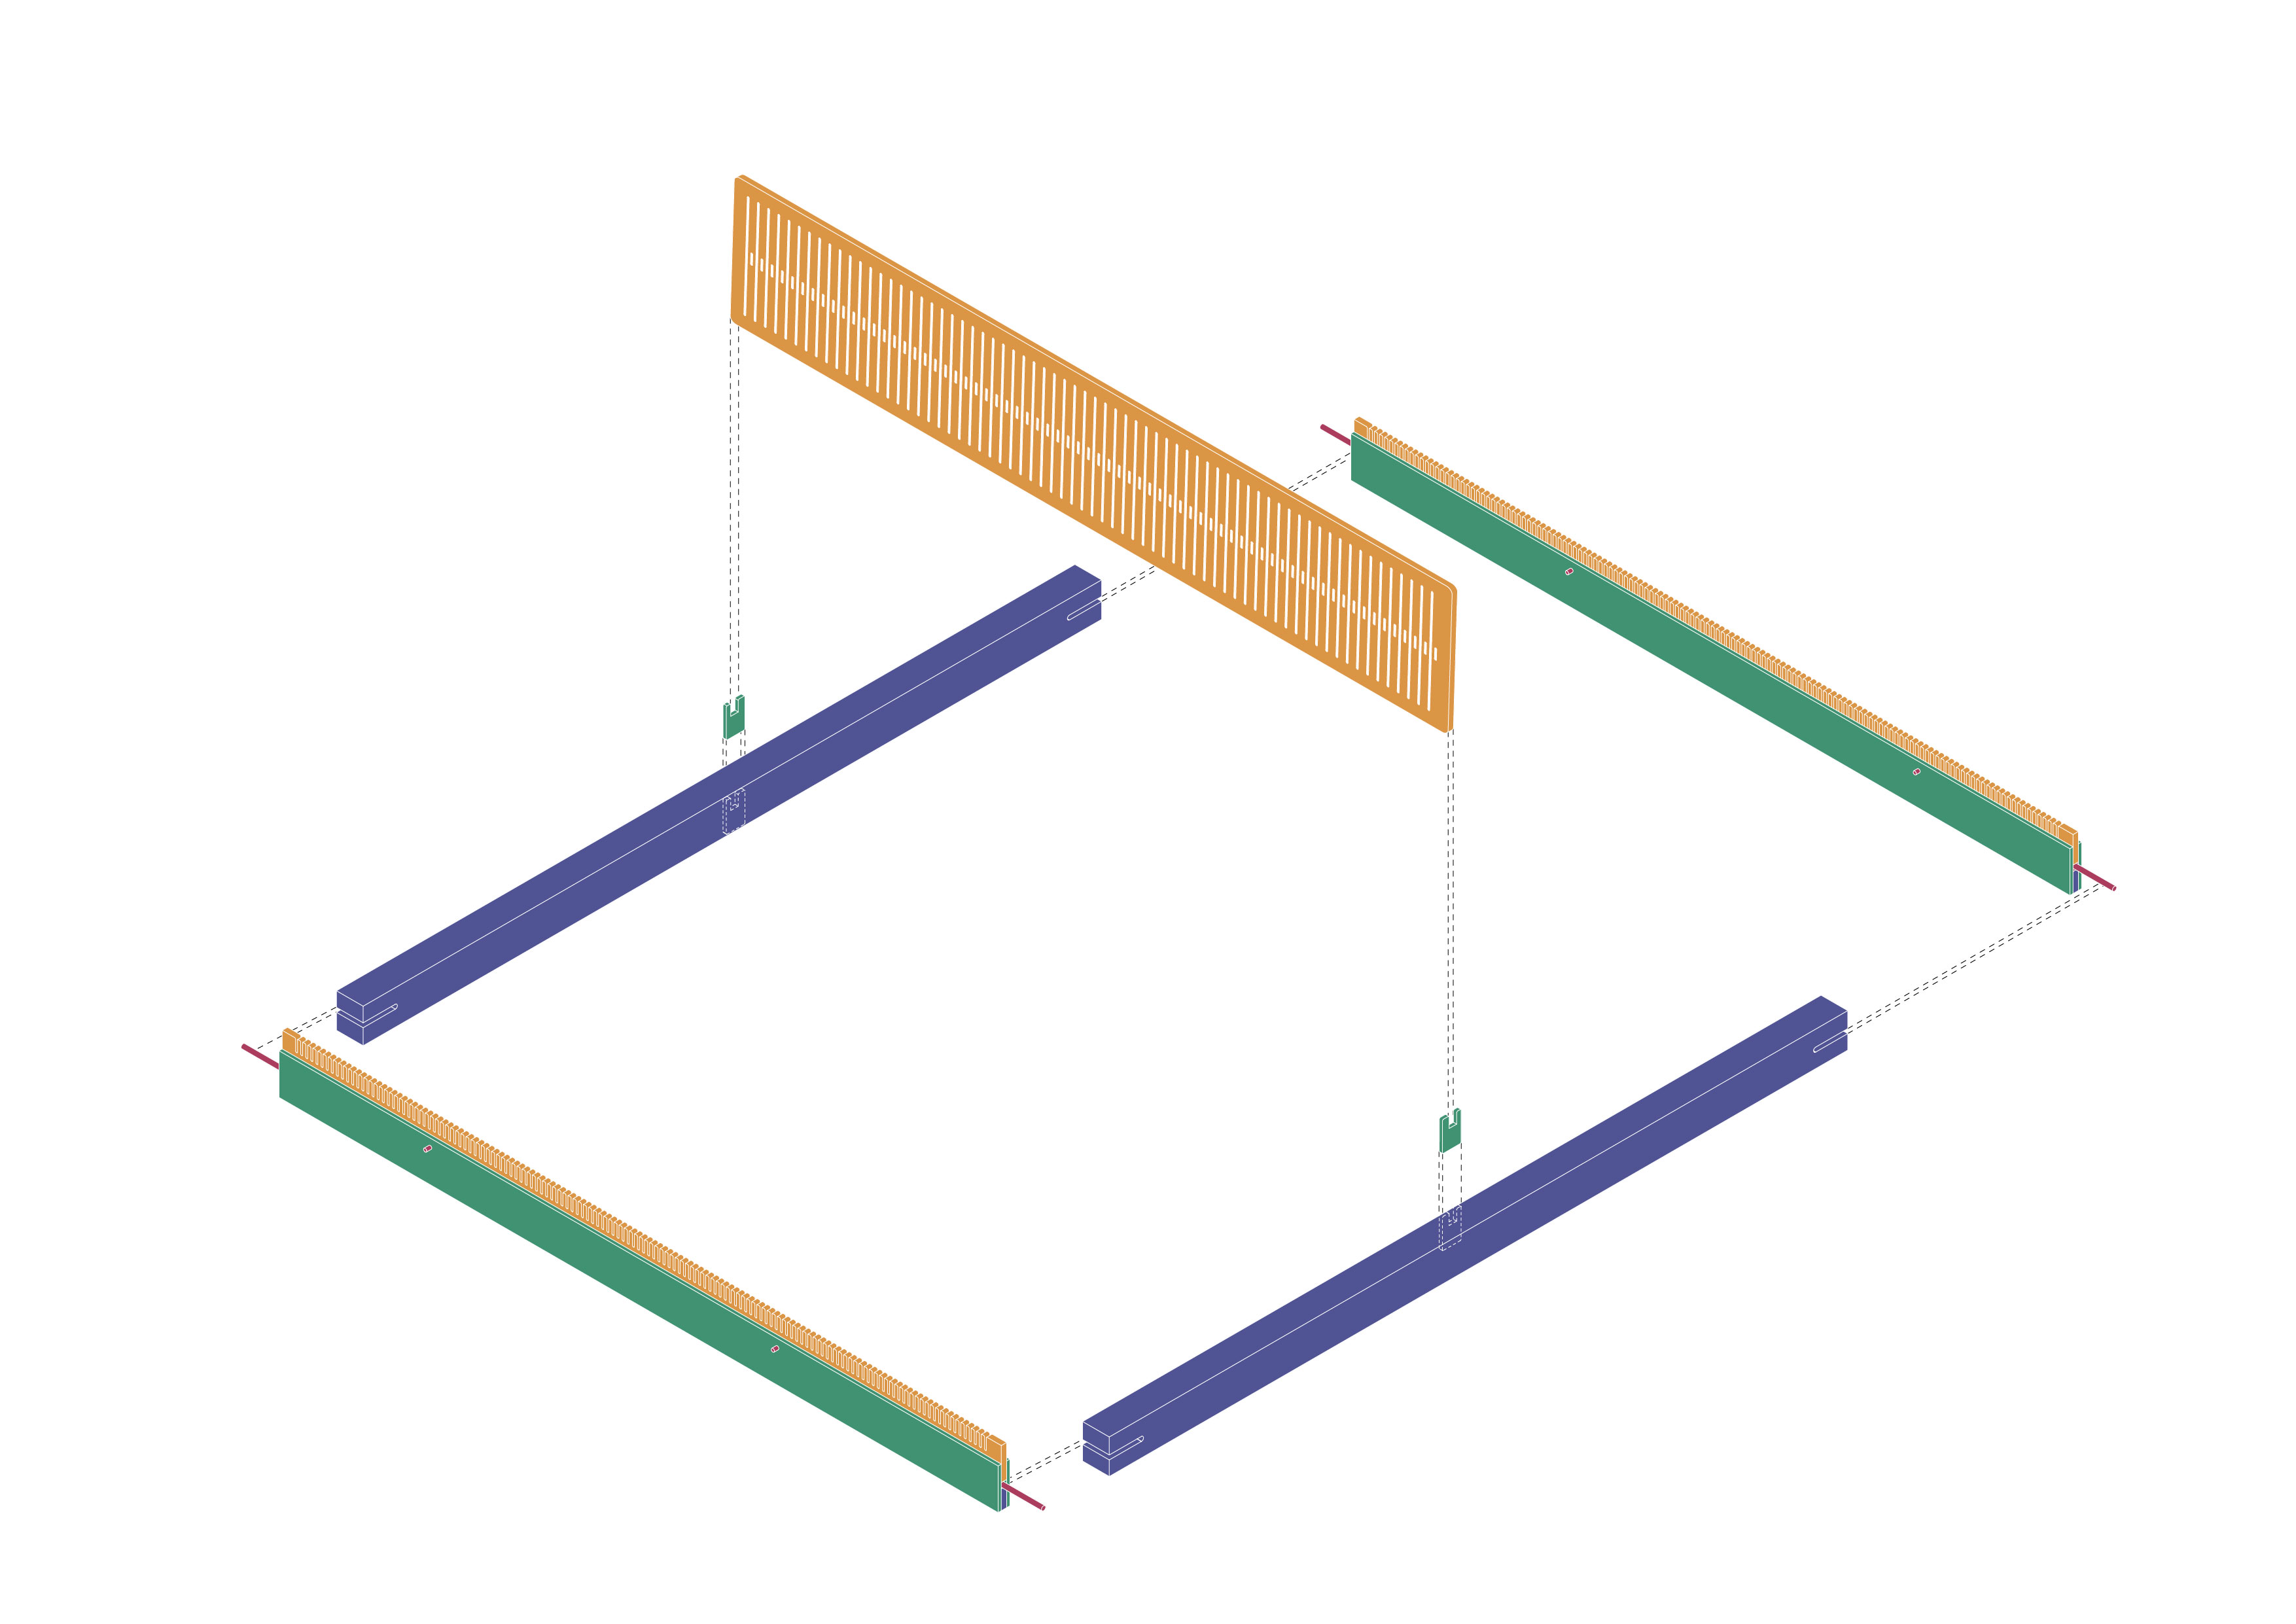
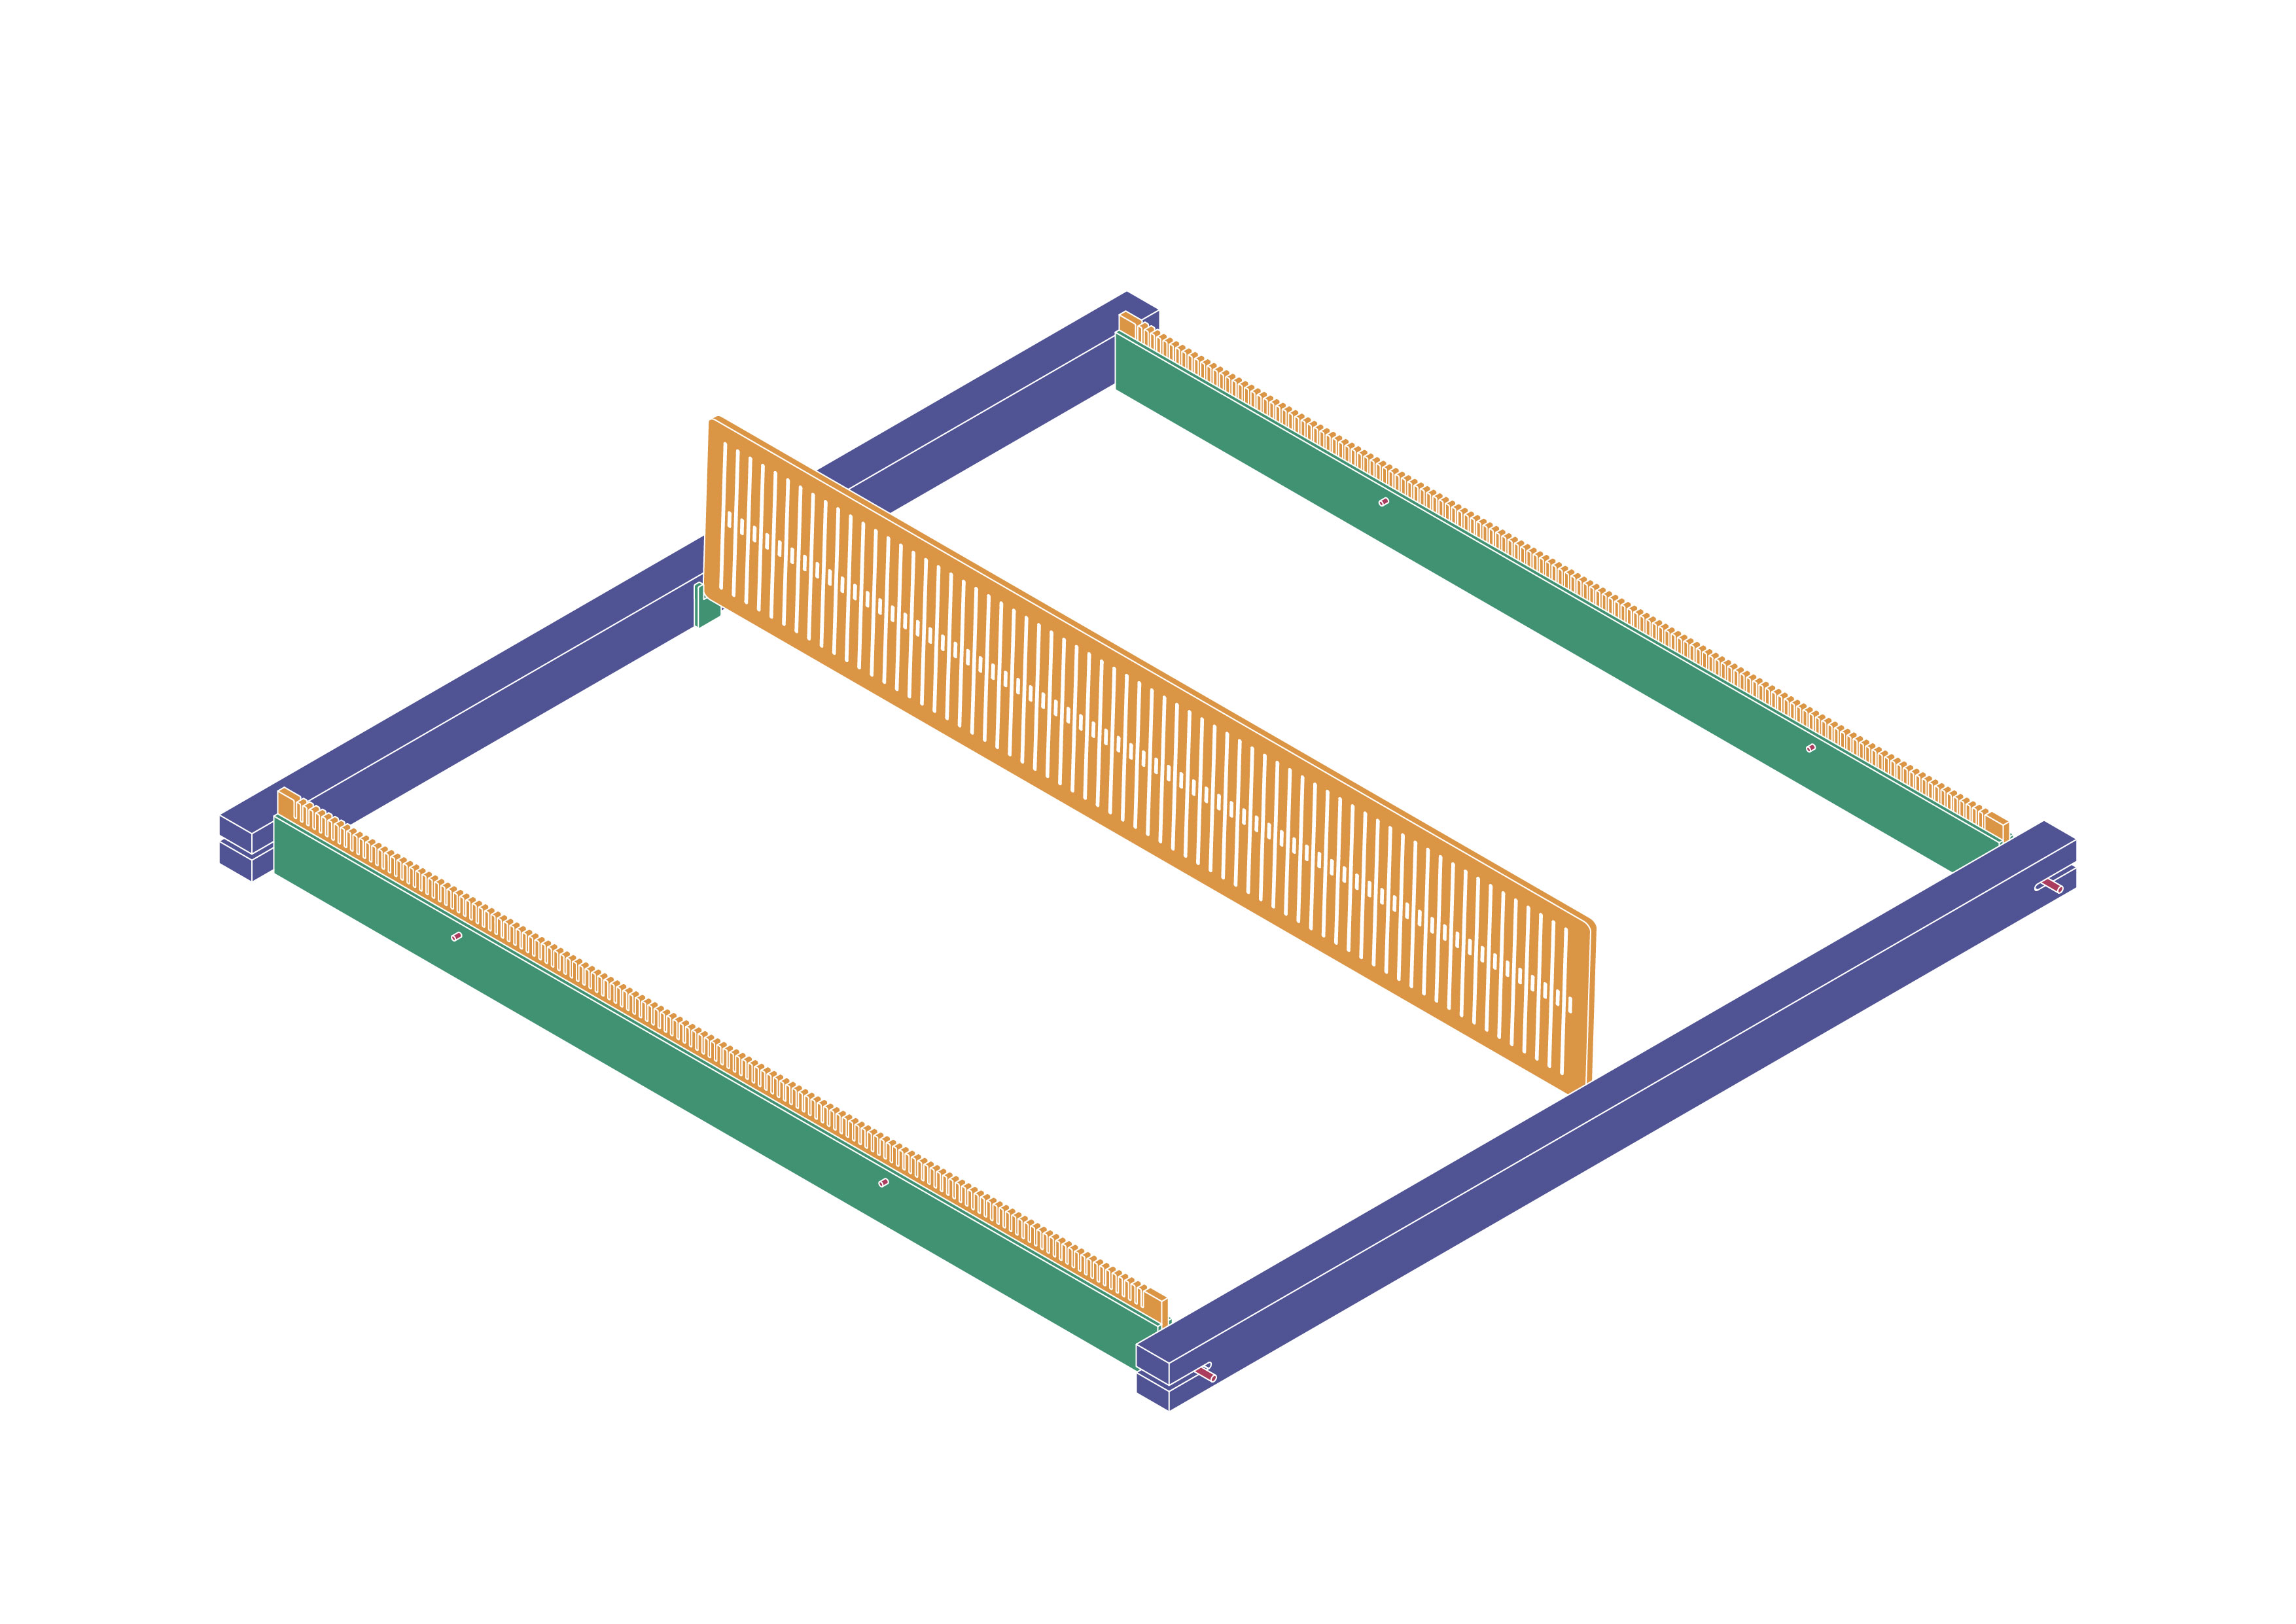
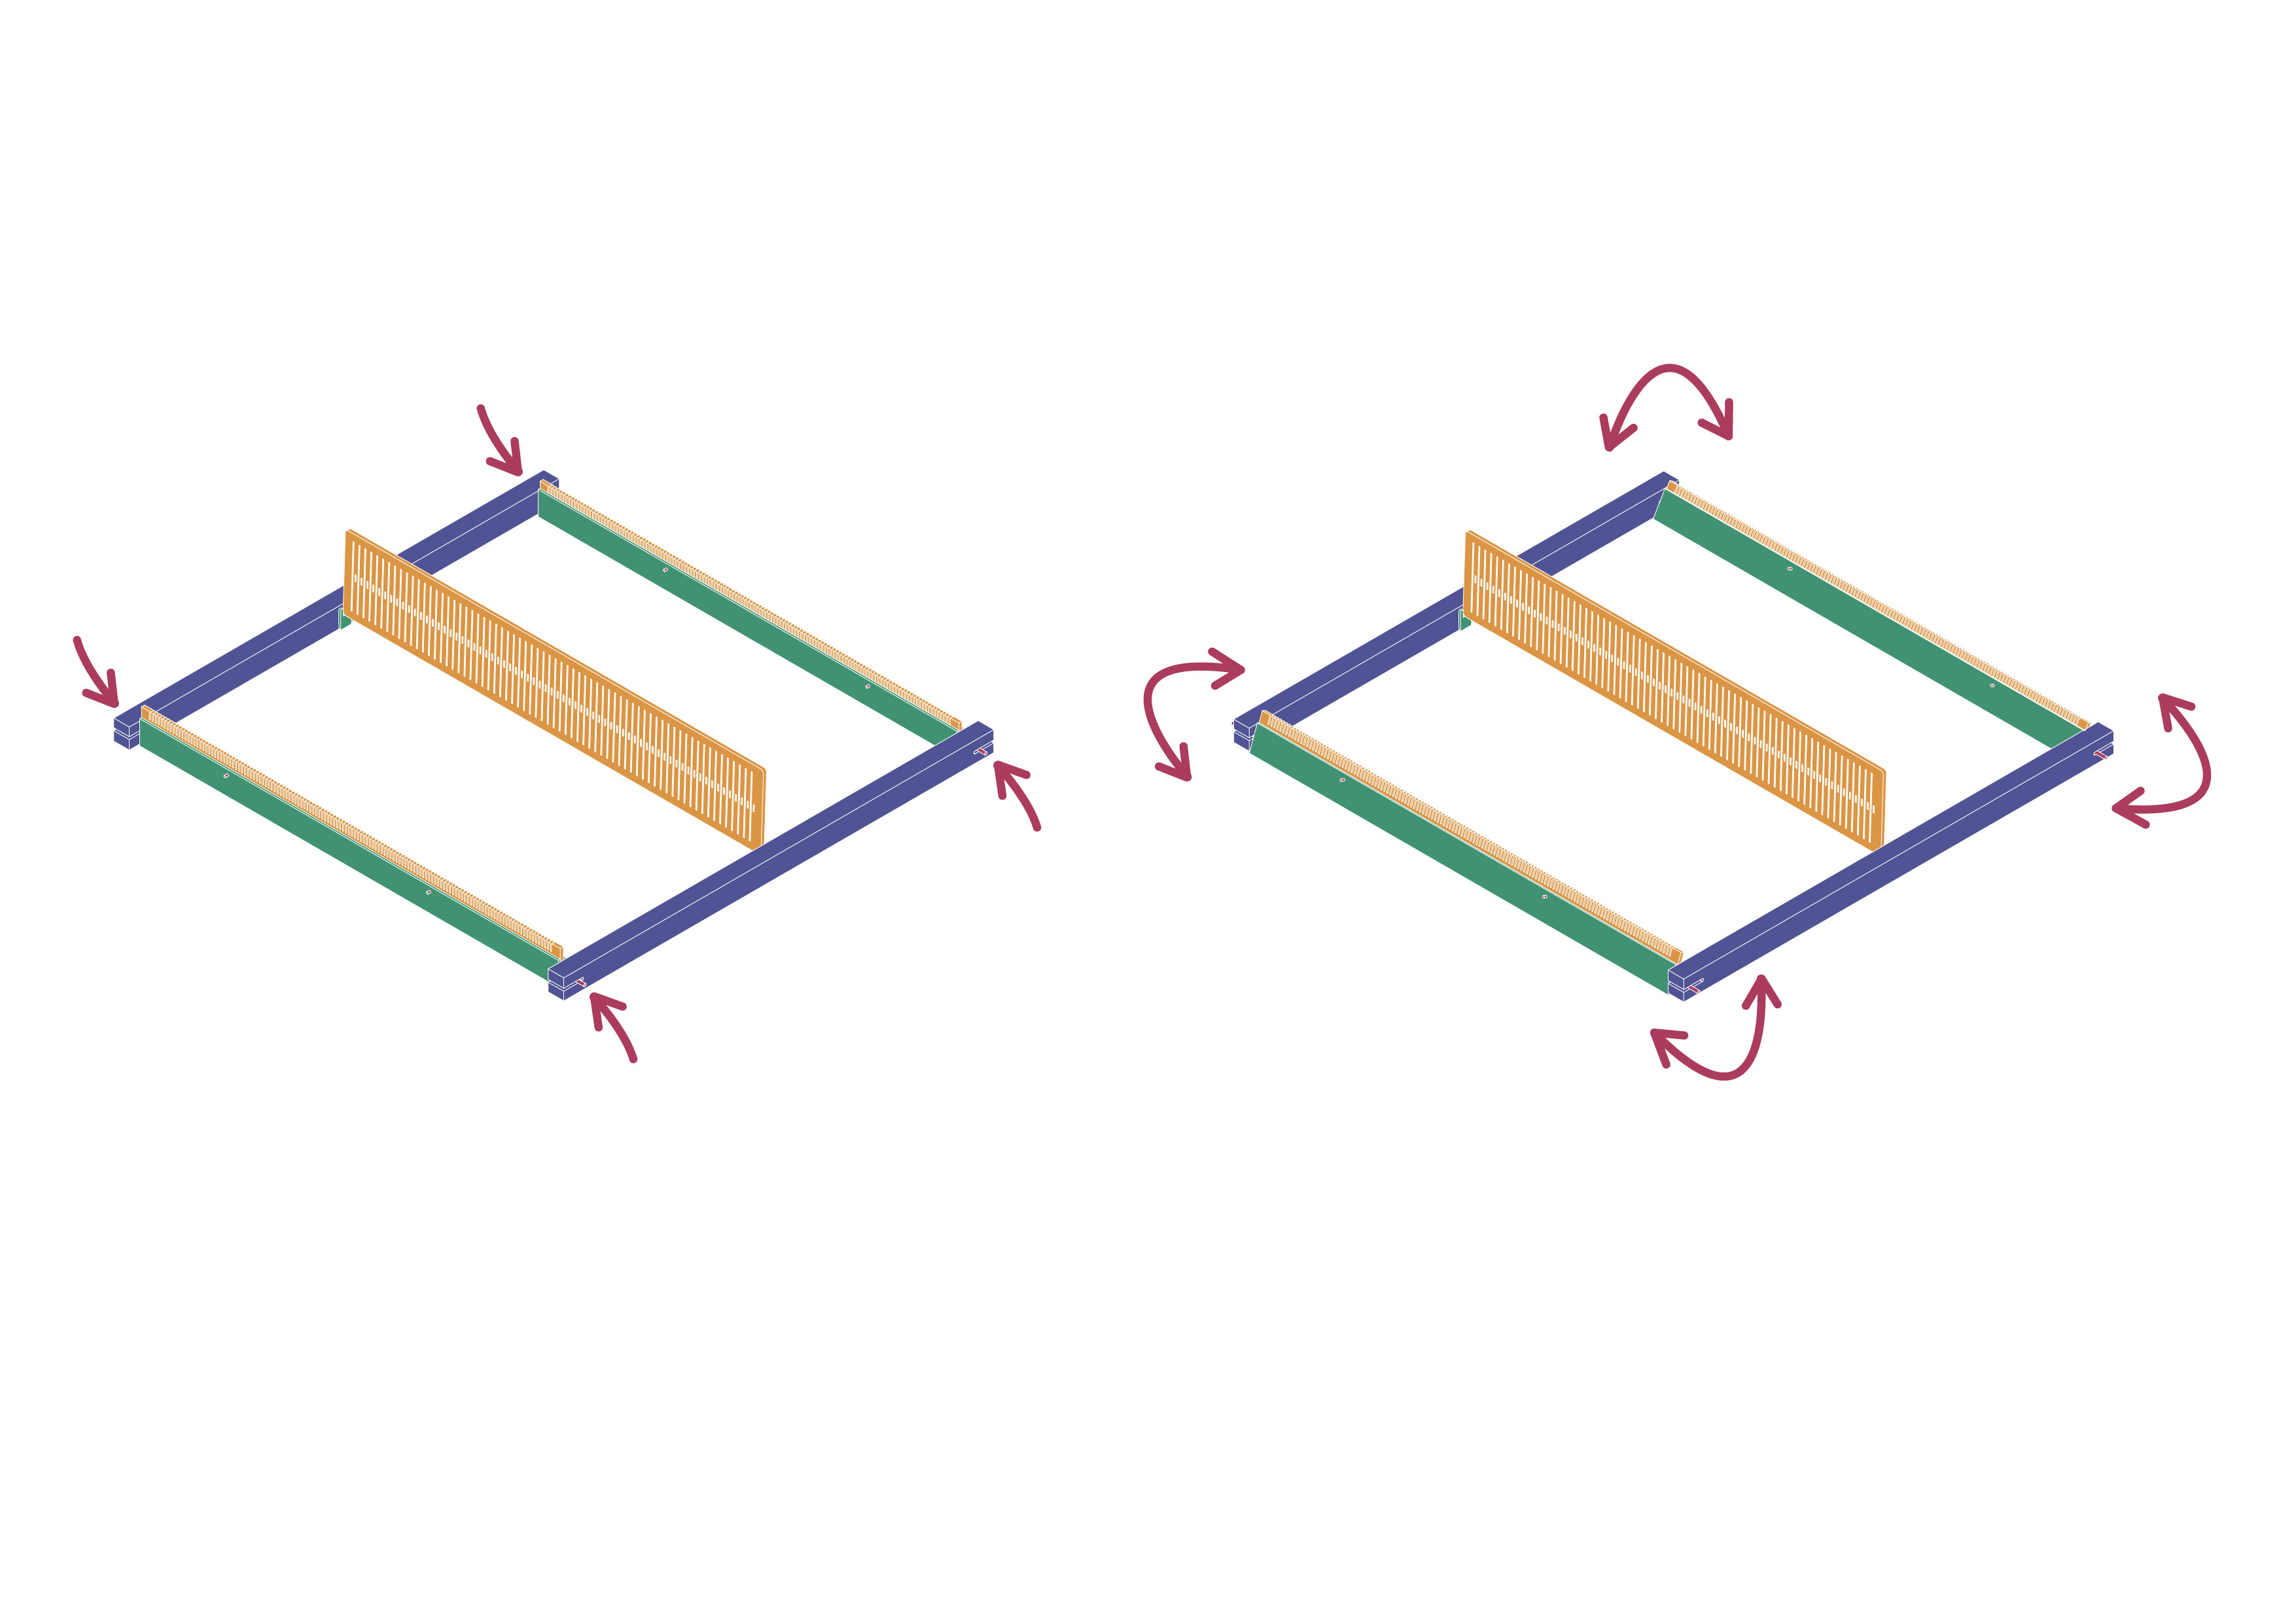
DIY Weaving Loom IAAC
Laser cutted weaving loom (S)
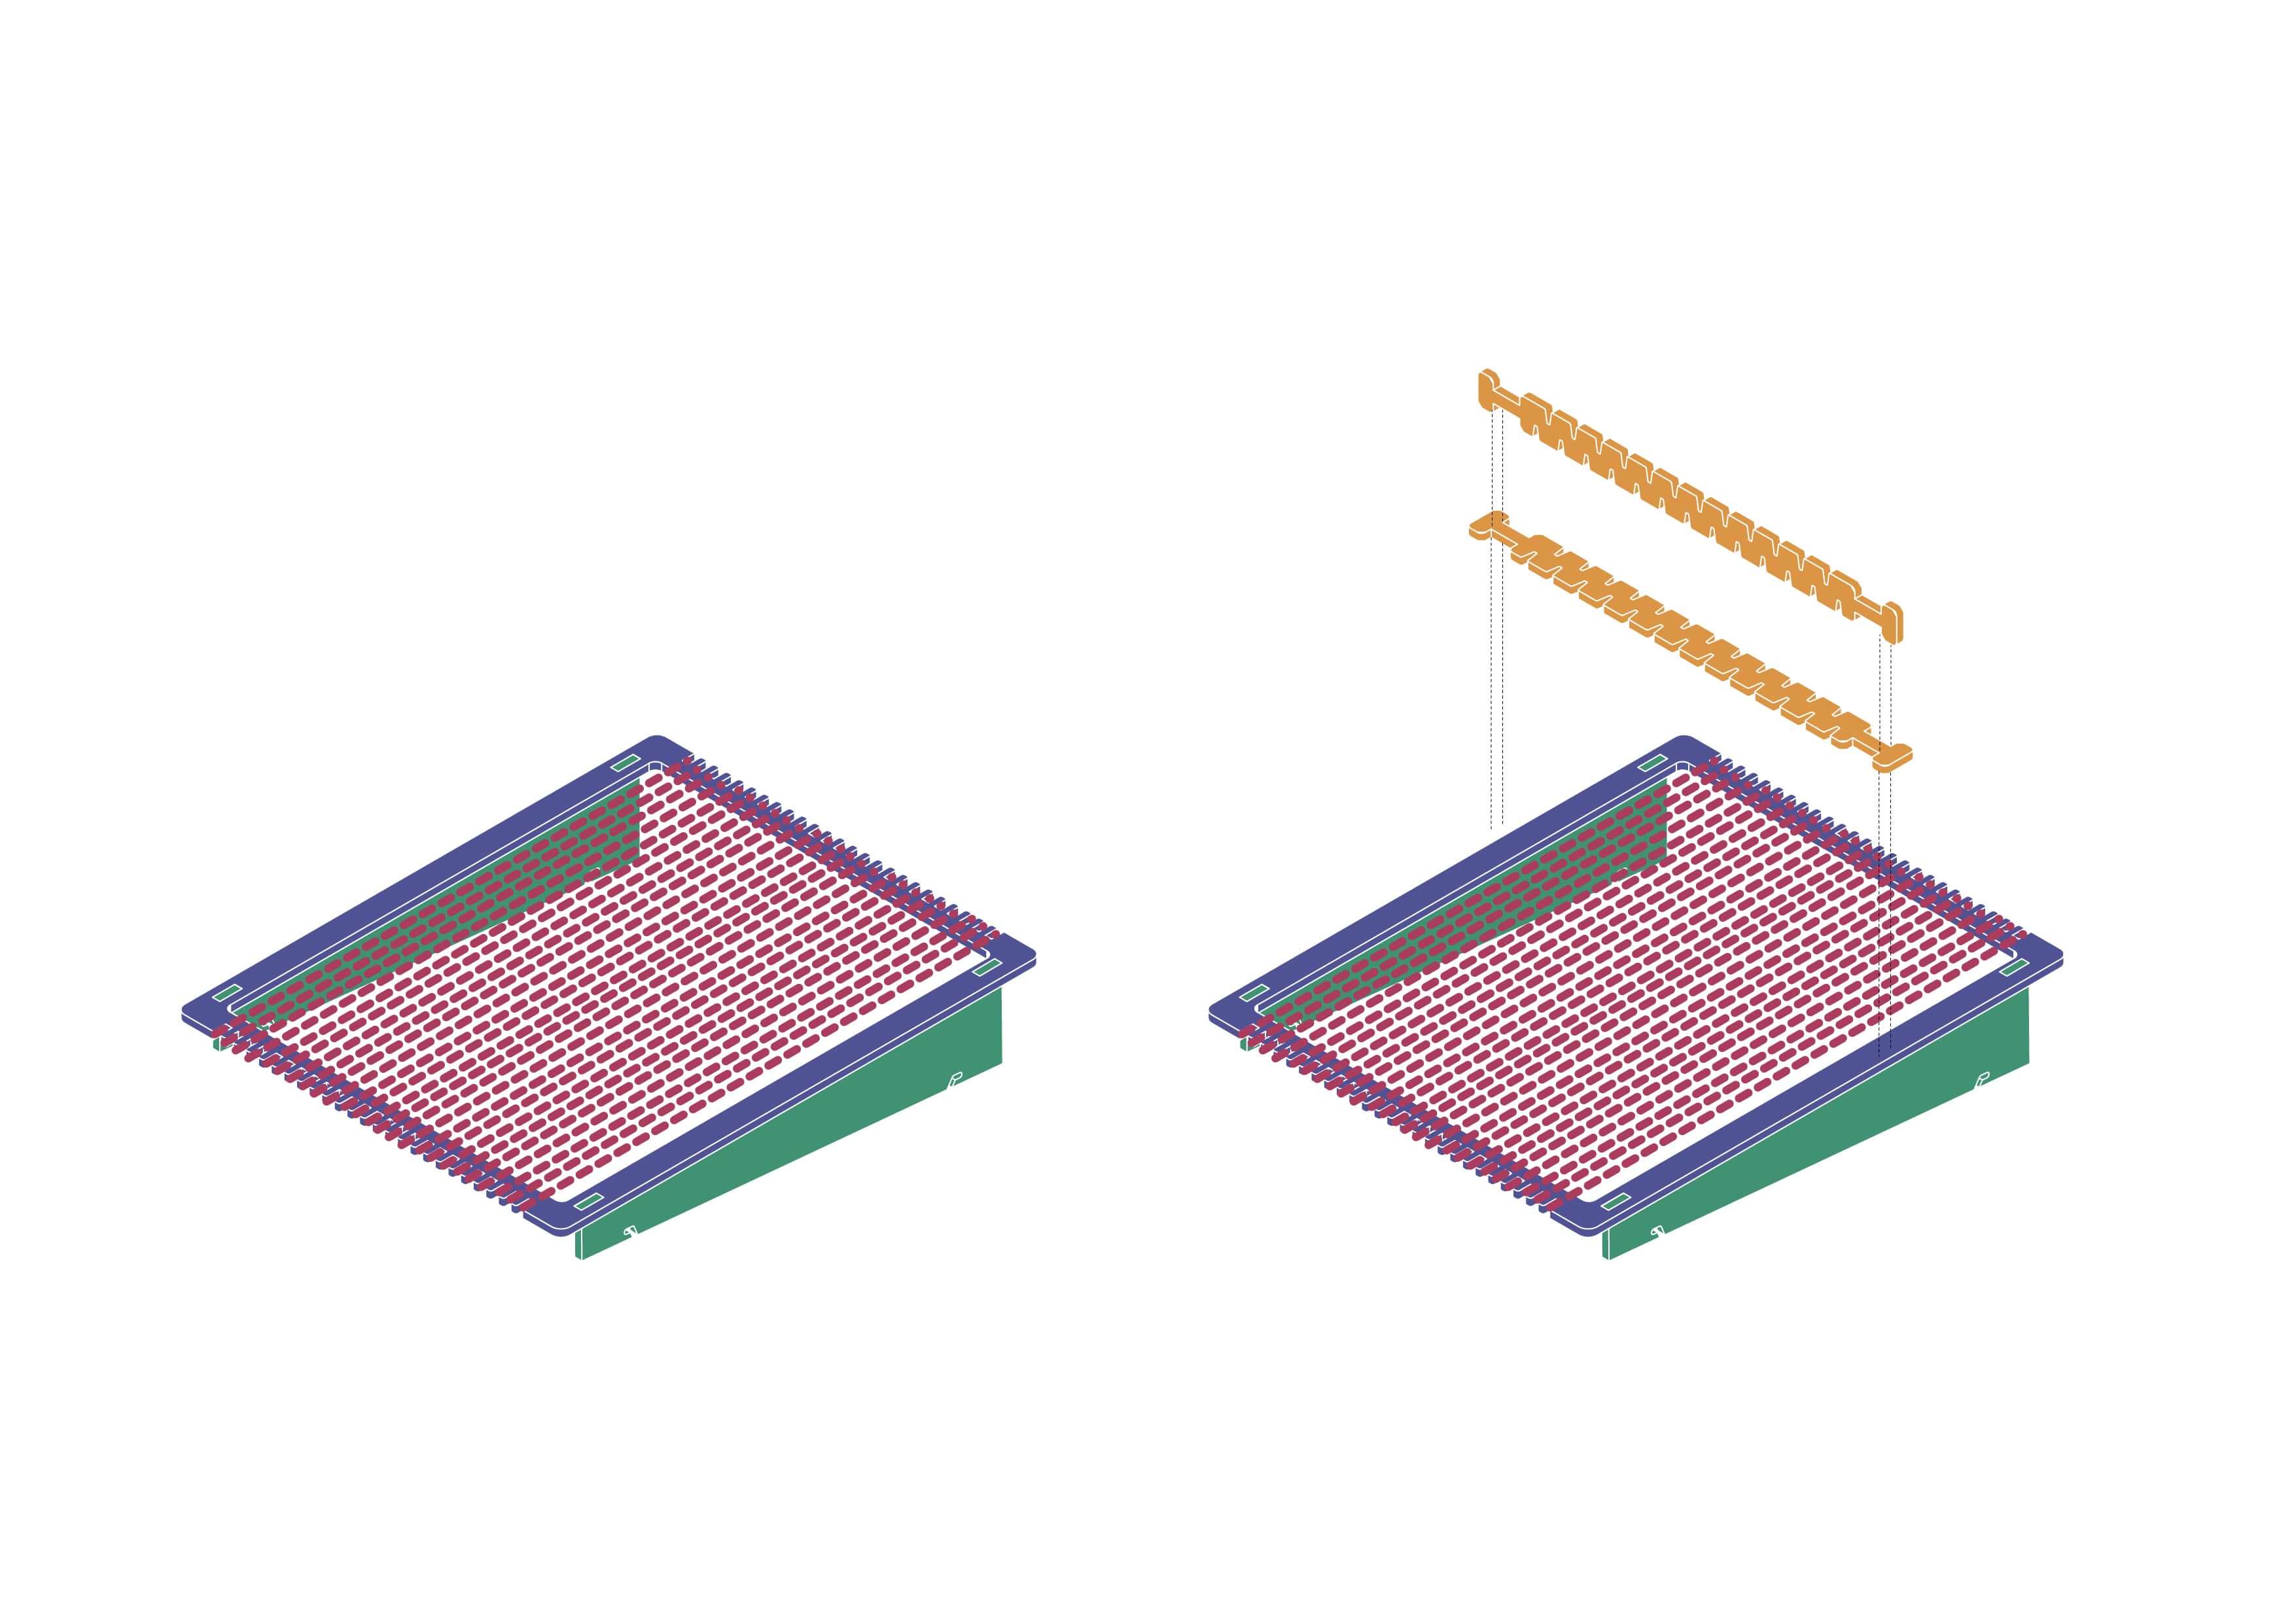
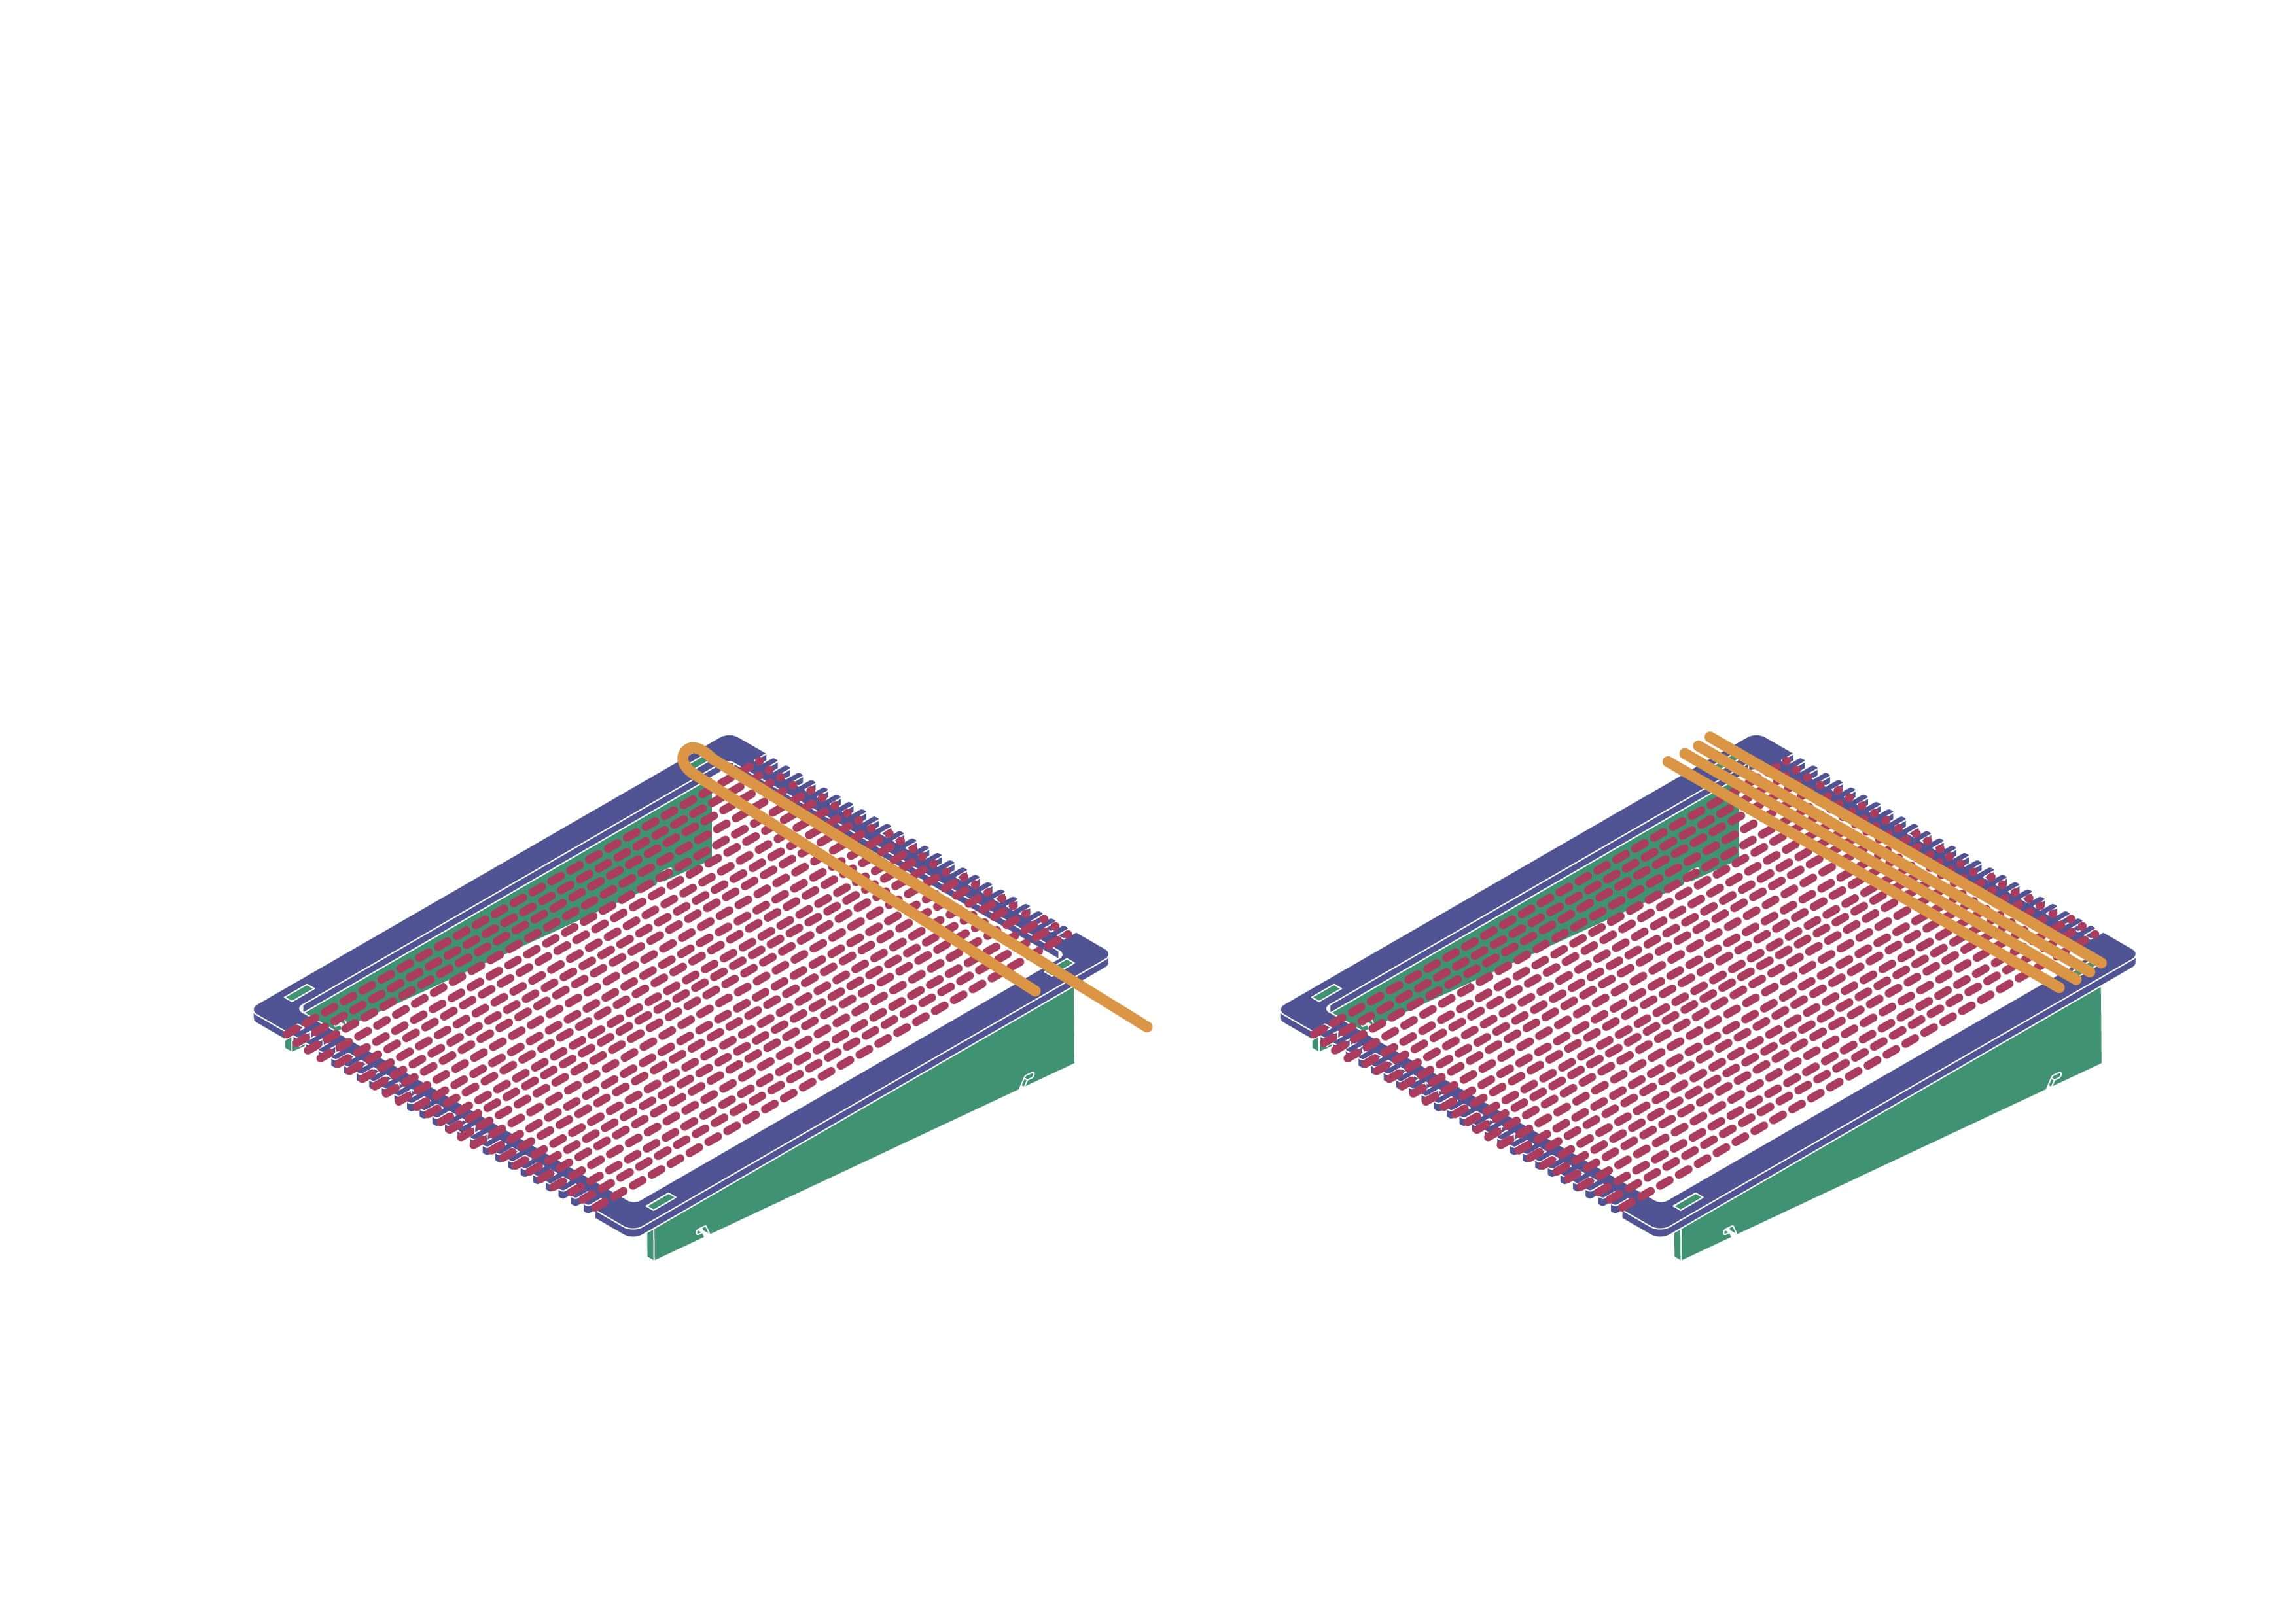

DIY Weaving Loom
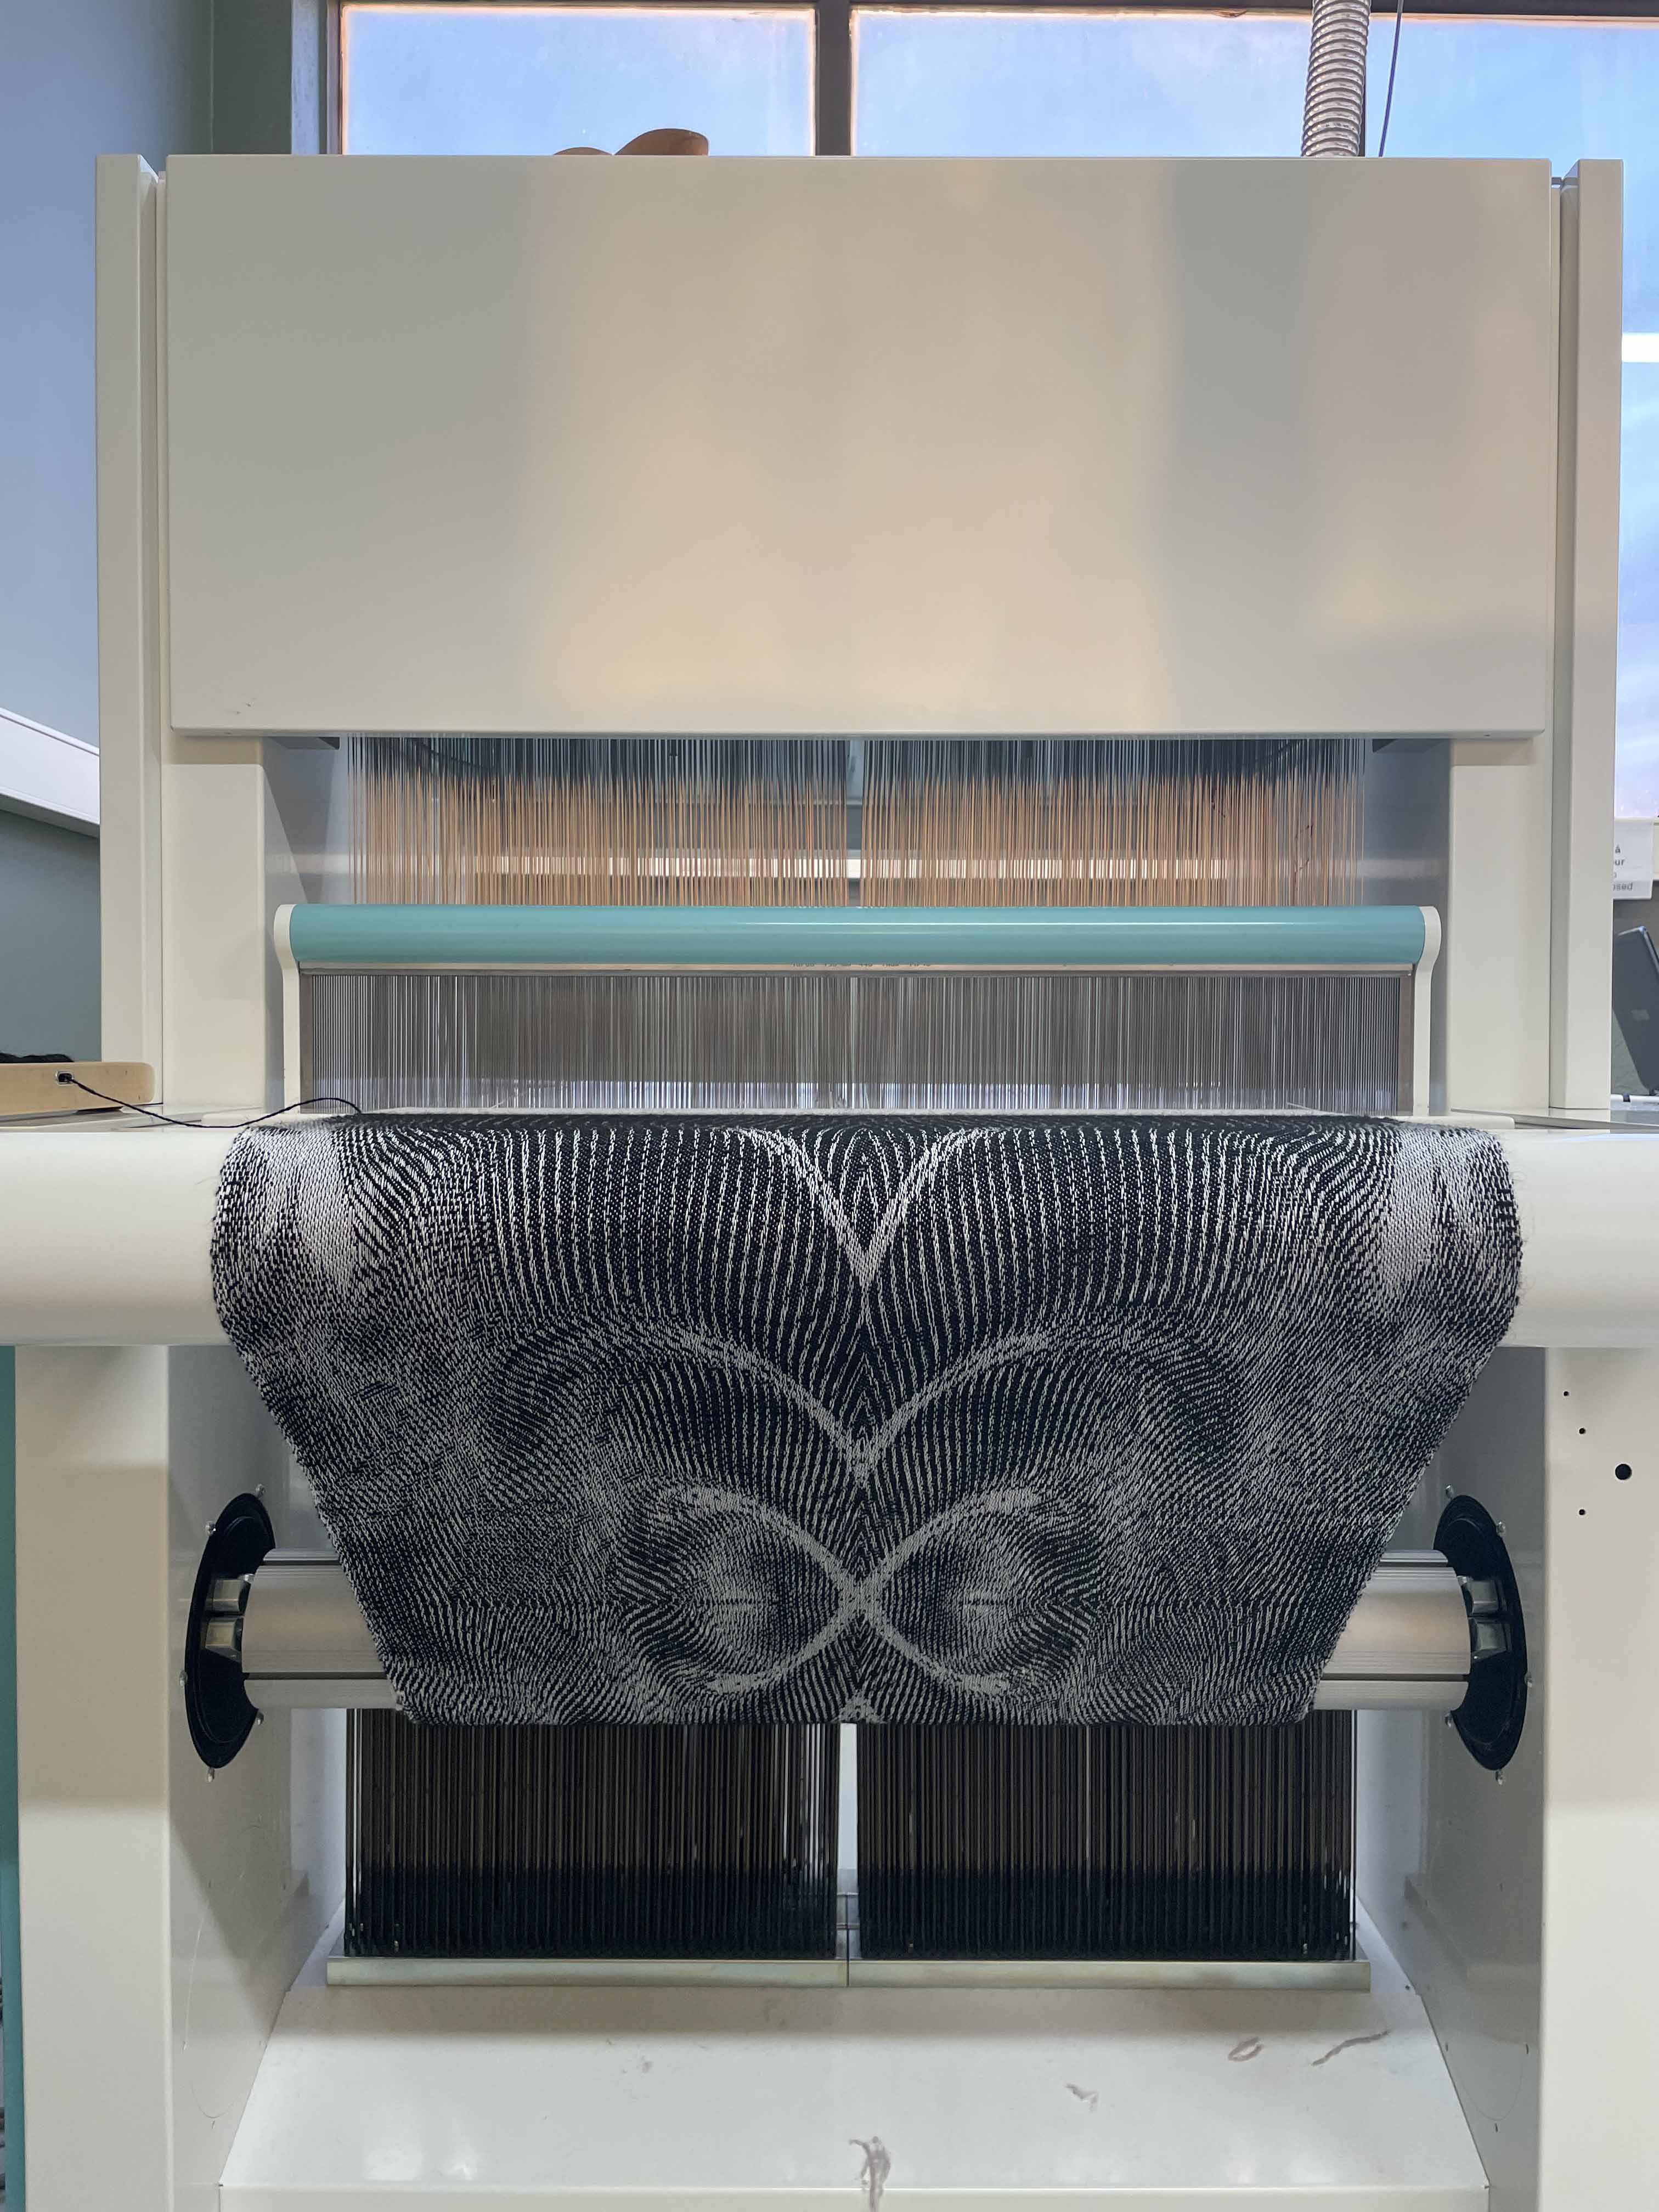
TC2 Digital Weaving Loom
- Content:
- I. Files preparation - softwares
- II. Files preparation - pixels and patterns
- III. Material preparation
- IV. Machine set up
- V. Fabrication
- VI. Post-process
DESIGN & SOFTWARE
You can create your own design in any software! Mine was done in Rhino and imported to Illustrator. You just have to import it to Photoshop as .JPG or .PNG.
PHOTOSHOP
The width of TC2 machine in the TextileLab is 1 085 pixels - what means that each pixel responds to each fiber of the machine. You can also use 2 or more colors during weaving but you will have to specify which color represent real color. In this tutorial I worked only witth two colors.
How to
- Start with creating a new board of 1085 pixels wide and **x** pixels long
- depending on your design and how long it will be your woven piece.
- Place your design into the new board.
- Make sure that your design contains only two colors
- IMAGE -> MODE -> INDEX COLOR (merge)
- If it does not show 2 colors you can try adjust contrast or black & white parametres to delete other colors in your file.
- Unlock the first layer with your design and select Magic Wand tool (W)
- create two layers - 1. for the black color and 2. for the white.
- Select your white background and put it into one of the layers and then the samee step if black color.
- Click on the layer with the white color and Add a layer style -> Pattern overlay.
- You will have to import your own library of patterns as .pat files.
- Select woven pattern for each layer - white for the white layer and black for the black layer.
- When you are ovelaying the pattern make sure that it says 100% Scale
- otherwise your design will be blurry and TC2 software will not recognise it
- Export it fromm Photoshop as .tif and import it into TC2 software.
Material preparation
Material preparation
- ...write your first step
- add an image of the process
- ...write your next step
- add an image of the process
- ...write your next step
- add an image of the process
- ...write your next step
- add an image of the process
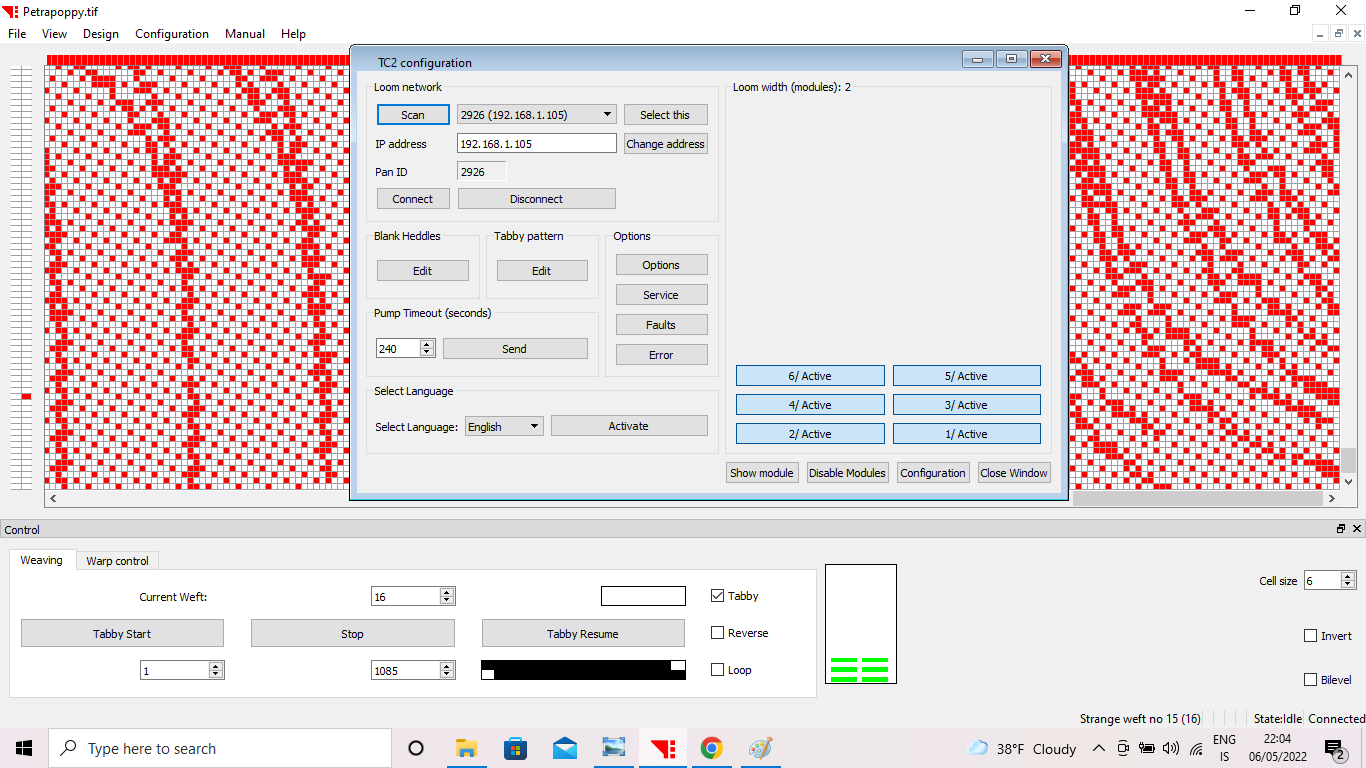
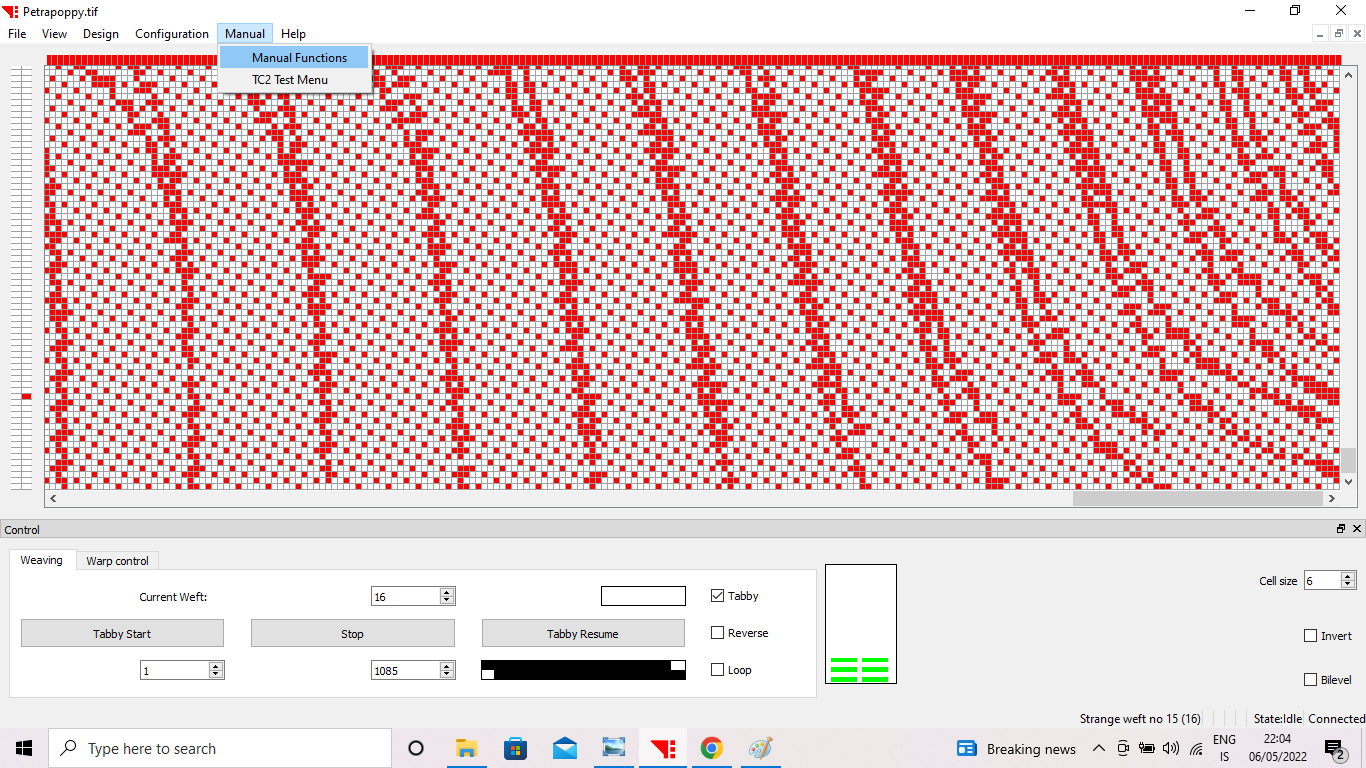
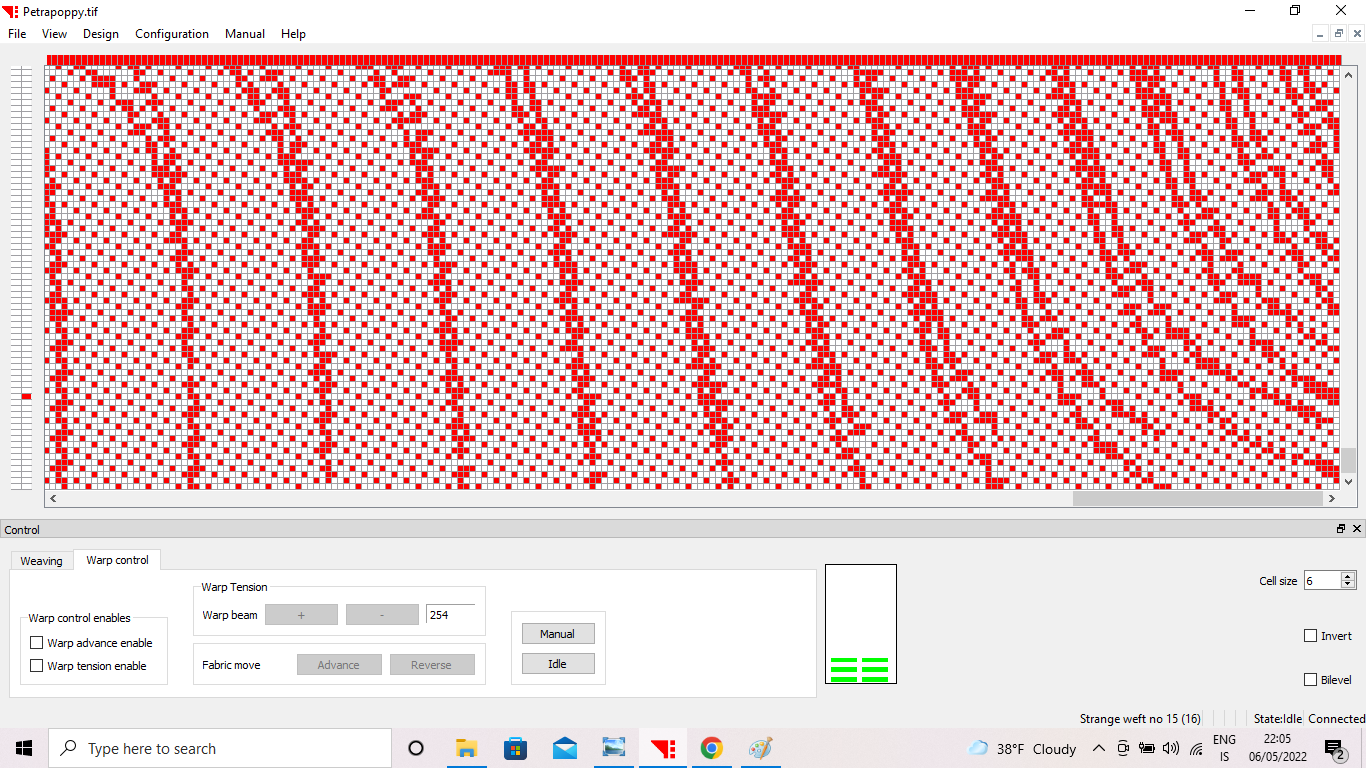
TC2 Weaving
How to start
- Connect the software with the machine
- CONFIGURATION -> TC2 CONFIGURATION -> SCAN -> SELECT THIS -> CONNECT
- you will hear the machine roar!
- First you have to start with TABBY what means that you will create a few rows as a beginnig of your pattern
- you can use is as an offset for sewing the parts together for example
- Select START TABBY and create approx 2 - 3 cm of Tabby