Voodoo Lapins
 {width=600}
| Path | Target | Duration | Skills |
|---|---|---|---|
| Curiosity | Kids 8 to 18 | 8 h | Electronics, Sewing, coding |
Introduction and context
Abstract
Voodoo lapin is a workshop to introduce kids to electronics and sewing. The participants learn how to make a soft circuit and integrate it into a soft doll.
Intro
The duration of the workshop is about 4 hours and it is addressed to children from 10 years old. All the pieces must be prepared in advance and unless it is decided to include laser cutting as part of the activity. In this case, the duration of the workshop should be about 8 hours.
For older kids, it is also possible to add a session about programming the Attiny (+4-6 hours) and also explain in details the function of each component (+ 1 hour)
We recommend having no more than 10 participants working in pairs, and two instructors. A second instructor is essential to take care of lengthy tasks such as unsoldering (if needed) or debugging wrong contacts, etc…
Objectives
- Understand how an electronic circuit works
- Be introduced to microcontrollers
- Learn how to solder
- Be able to create soft sensors and switches
- Sew components and the doll
- Make your own toy
Target audience and context of use
Children from 10 years old. The activity can be organized in a makerspace, during a festival and also at school, where the extended version is recommended.
Preparation and materials
Prepare a room with 2 big tables to encourage exchanges between participants, 1 table with the material for the steps and a table for ironing. Prepare posts for each child with the material for Step 1 and the soldering irons.
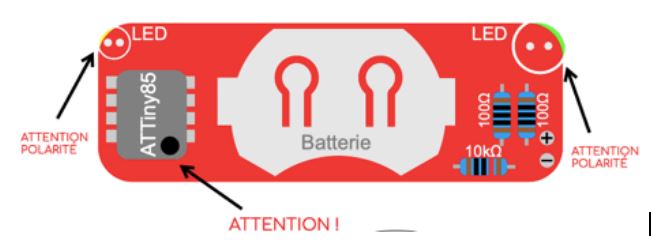
Prepare the laser cut pieces. Upload the code to each Attiny45.
Prepare a voodoo lapin to show the participants the final result. Prepare also examples of the intermediate steps to show the soldered PCB and the soft-hard connections.
Create your team of facilitators and organize some testing sessions and brief meetings for coordinating with facilitators.

Equipment, Tools and Materials
- Laser cutter
- Room and tables
- Iron
- AVR programmer (Sparkfun)
- Soldering irons
- Solder
- Goggles
- Portable fume extractors
- Cutting pliers for electronics
- Needles
- Voodoo Lapins PCB
- Attiny45
- Pinheader 1x4
- Resistor 100 Ohm
- Resistor 10kOhm
- Battery holder
- LED 3mm (green, yellow or red)
- LED 5mm (green, yellow or red)
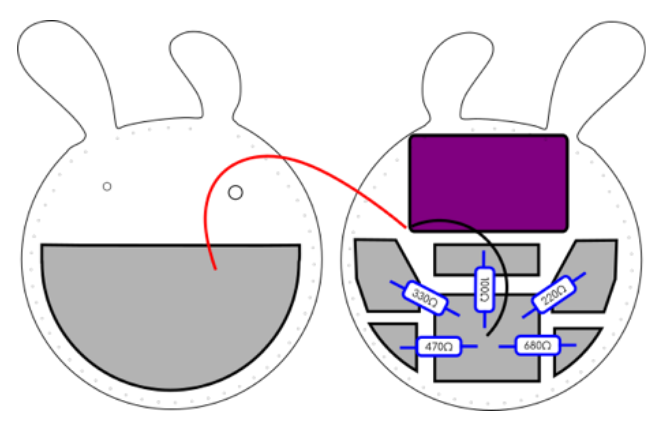
- 5 resistors 1% : 110 Ohm, 220 Ohm, 330 Ohm, 470 Ohm, 680 Ohm
- Wires
- Conductive fabric
- Thermocollant fabric
- Thin felt
- Thread
Step by Step Instructions
STEP BY STEP overview
- Laser cut the felt : 2 pieces for the body of the doll, mouth and patch-eye for decoration .svg available - drawings
- Iron the thermocollant fabric to the conductive fabric. Laser cut it. .svg availables- code
- Upload the Voodoo Lapin code on the Attiny45 via a AVR programmer
- Solder all the components and the wires following the attached scheme
- Glue the conductive fabric to the felt with an iron following the schema below
- Solder the resistors and the wires to the conductive fabric following the schema below
- Test the connections using a crocodile wire: by connecting each of the 6 pieces on the back of the Voodoo lapin to the conductive fabric on the front part, the leds shall blink differently
- Fill the lapin with cotton or fillings for dolls
- Sew the borders to connect the parts. We recommend to use the blanket stitch following the pre-cut holes
- Glue the mouth, the eye patch and the button around the small LED with white glue. It might be needed to enlarge the hole of the button to make the light of the led more visible
- Test the Voodoo Lapin with a needle : depending on where it’s picked, the eyes of the lapin should blink differently. If not picked, the leds shall not be on.
- If one or more connections don’t work, massage the doll to see if it’s caused by a short-circuit between the conductive fabric.
- If the problem is not solved, open the doll, check the connections and add more filling to make sure that the back and the front part don’t touch.
Safety rules & Tips
Soldering can be a dangerous activity for children if done improperly.
- Leave enough space for the soldering iron and cables
- Explain how to use a soldering iron and the dangers
-
Keep a cream against burns in case of small accidents
-
Ask kids to wear goggles when they cut the extra legs of electronic components.
Flyer for participants
Estimated cost
We recommend purchasing tools and materials locally, the cost is approximate and the list serves as reference. You might plan some costs for getting the materials and tools but also some fees linked to your collaboration with the place you run the workshop.
| Item | Quantity | Cost (€) | Link to vendor |
|---|---|---|---|
| Colored wool felt 15x25cm | 1 | 5 | www.ariadne-shop.ch |
| Colored wool felt 15x25cm | 1 | 5 | www.ariadne-shop.ch |
| Colored wool felt 6x5cm | 1 | 2 | www.ariadne-shop.ch |
| Soft filling | 1 | 1 | www.opitec.ch |
| Thread 3m | 1 | 0.5 | Local store |
| Needle | 1 | 0.5 | Local store |
| White glue | 1 | 1 | Local store |
| Buttons | 2 | 1 | Local store |
| Film thermocollant 10x12cm | 1 | 1 | www.opitec.ch |
| Film thermocollant 18x12cm | 1 | 2 | www.opitec.ch |
| Conductive fabric 10x12cm | 1 | 3 | www.adafruit.com |
| Conductive fabric 18x12cm | 1 | 3 | www.adafruit.com |
| Attiny 45 | 1 | 2 | www.adafruit.com |
| Resistors 100 Ohms | 2 | 0.4 | www.digikey.com |
| Resistor 10KOhms | 1 | 0.2 | www.digikey.com |
| Battery holder CR2032 | 1 | 1.5 | www.digikey.com |
| Battery CR2032 | 1 | 2.5 | Local store |
| LED 3mm green, yellow or red | 1 | 0.5 | www.digikey.com |
| LED 5mm green, yellow or red | 1 | 0.5 | www.digikey.com |
| Resistor 100 Ohms précision 1% | 1 | 0.2 | www.digikey.com |
| Resistor 220 Ohms précision 1% | 1 | 0.2 | www.digikey.com |
| Resistor 330 Ohms précision 1% | 1 | 0.2 | www.digikey.com |
| Resistor 470 Ohms précision 1% | 1 | 0.2 | www.digikey.com |
| Resistor 680 Ohms précision 1% | 1 | 0.2 | www.digikey.com |
| PCB | 1 | 3 | www.oshpark.com |
Evaluations Criteria The participants were evaluated by observation and by answering a short survey at the end of the activity.
Tips to facilitate the activity in context (to-do / not do)
To do:
- Give kids enough time to solve problems
- Encourage kids to exchange and find solutions together
- Prepare a safe and neat working space
- Don’t scare kids with the dangers of soldering
- Keep the shape of the doll easy
Not to do:
- Work in a hurry
- Debug problems without explaining the children the issue
References
Links to photos and recorded materials


Licence and credits

Attribution — ShareAlike CC BY-SA
This activity has been designed by Cristina Olivotto from Onl’fait for shemakes.eu. It is based on an idea from the SWISS SOCIETY FOR MECHATRONIC ART and further developed with the collaboration of Christophe Cachin/Fab Labs Suisse
Related and supporting activities/modules
It can be combined with the other topics within the Wearable Technology Package of Fabricademy, such as Wearables.