Leather Moulding
| Path | Target | Duration | Skills |
|---|---|---|---|
| Discovery | 18-25 | 1 week | 3D modeling(Rhino & Grasshopper), sewing, leather moulding |
Introduction and context
This activity consists in the fabrication of moulded leather accessories such as pouch, wallet, bag, e.t.c. Participants will use a 3D modelling software (Rhinoceros 3D) combined with parametric design (grasshopper) to model a shape to be made with the CNC milling machine. The shape will be used as a mould for forming and hardening leather.
Learning Outcomes - Concept development - Design: sketching - 3D modeling and parametric design skills - Digital Fabrication: able to run from file to workflow, from 3D modeling to 3D - Aesthetics: has the design been throughout and developed
Target audience and context of use
This activity has been piloted by On’l Fait during the Fashion and New technologies week in collaboration with HEAD. 26 number of participants coming from 2nd year of Bachelor in Fashion Design. The activity can be adapted to a broader audience of Bachelor or Master Degree students coming from the field of design, textile, fashion, students.
Preparation and materials
There are 2 presentations (FR) (one describes the workflow, softwares and inspiration references while the other one focuses on the leather moulding process). You can adapt the example with your own design concept.
Create 4 pairs
Make sure all students have rhino on their computer to save time or at least one per duo. Be careful, mac and windows have different layouts for rhinoceros 3D and if it is a specific language be sure to know the commands in that language.
Check you have all the tools and materials needed and that you will have time to do the zines at the end of the day.
Prepare in advance: - Precut frame of plywood (4mm thick) - Fabricate an example of the two part mould to show to the group - when starting the leather moulding process be sure to have a tub of hot water ready.
Equipment, Tools and Materials
- Rhinoceros 3D
- Grasshopper
- ired machine
- CNC milling machine - Milling Bits:
- Finishing tool Uppercut, 1.4” diameter
- Finishing tool: Uppercut, 1.8” diameter
- Laser cutter,
- Leather Sewing machines
- Leather (thickness: 0.5-1.5mm)
- plywood (148mm x 210mm x 40mm) x2 (for the moulds)
- plywood 198mm x 250mm x 4mm (for the frame)
- Wood Lacquer/varnish/ (each of them are great waterproof sealant)
- CNC mill the moulds
- Laser cut the frame
- Clamps or Bench Vices
- Heat gun
- Textile scissors
- brushes
- pot
- hot plate or kettl
- silicone gloves
- protection sheet to cover the table from water
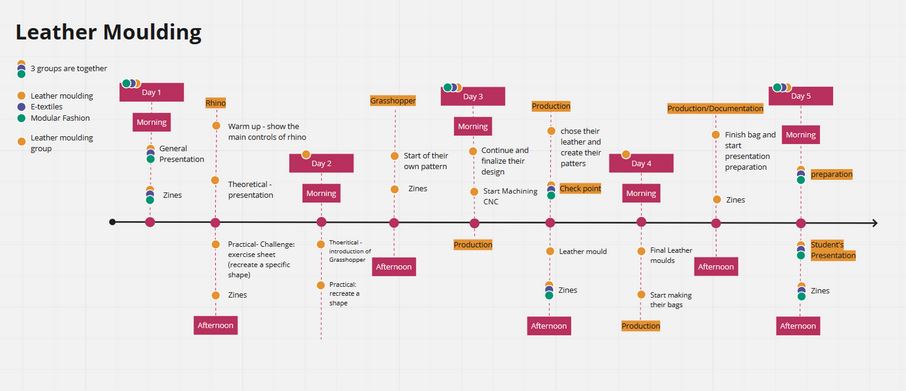
Proposed Schedule Schedule: 9:30 am -1:00 pm and 2:00pm – 5:30 pm: 45 Hours in total
Specifically the leather moulding agenda:
Presentation
Each of the groups have to do a presentation of their week.
Here are the link of their presentation
Learning the software - Making the mould
Rhinoceros 3D
What is it? Rhino is a 2D and 3D modeling software. The facilitators and the participant can download a trial evaluation of 90 days.
The first part of the workshop the participants need to understand how Rhinoceros 3D works. You first have to demonstrate these tools so they understand how to access them and what they do. (which are tools and understanding needed in the making of the moulds)
The tools:
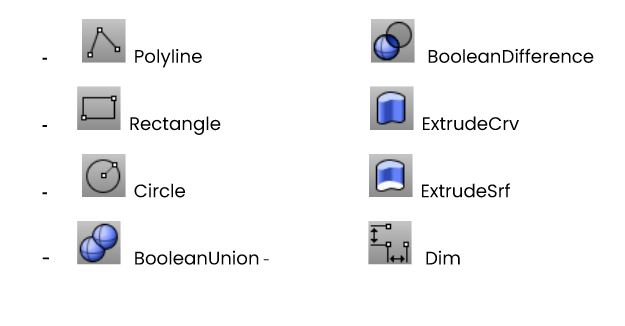
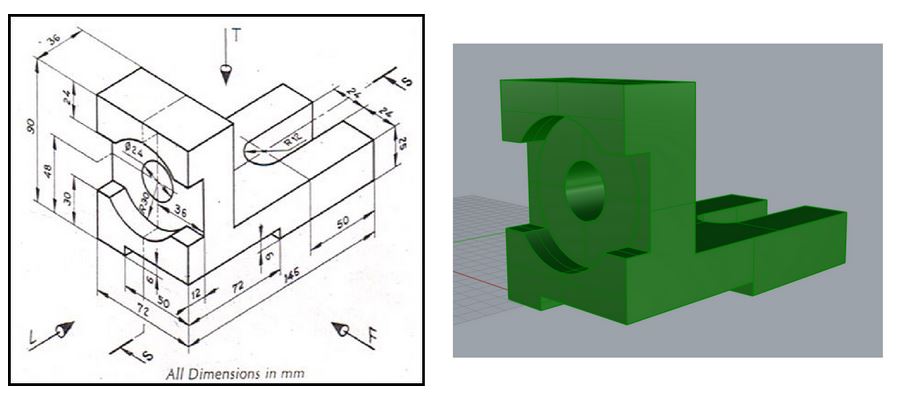
Afterwards they are given a sheet with a shape with dimensions that they have to recreate with their previous understanding of the tools.
The shape:
Grasshopper
What is it? Grasshopper, a plugin of Rhino, is a visual programming language and environment
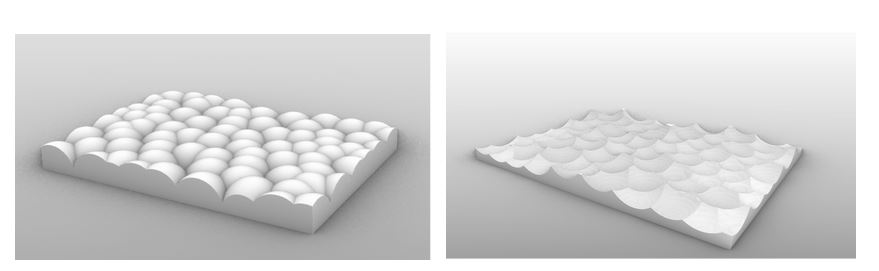
Their first task on grasshopper is to understand the program by recreating an example pattern which are these two moulds with an exercise sheet
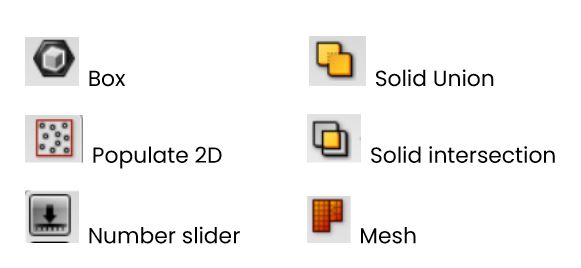
The tools that they need to understand are:
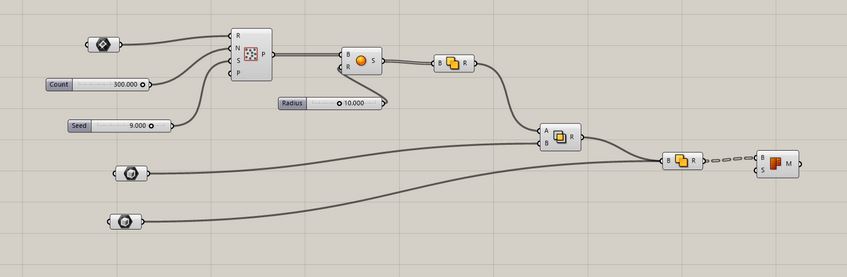
This is the basic circuit they have to make:
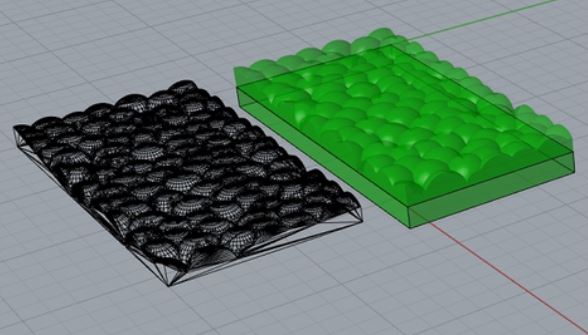
Result:
Then they have to create their own pattern by exploring and changing the circuit (for example change of the population size, diameter of shape, change shape or add an equation ect..)
When the moulds are made, the file is saved as a stl and put in the CNC to milled.
Leather moulding - Step by Step Instructions
activity sheet (with pictures)
STEP BY STEP overview
- Waterproof your MDF or plywood moulds with varnish/lacquer and let them dry.
- Choose a piece of leather and cut it so that it is slightly bigger than the mould. (for example 15mm from all sides)
- Soak the leather in 85 degrees water for (1-2min)
- timing may vary according to the thickness and type of leather. Small sample trials are suggested
- Place the letter on the positive mould, choosing the correct side (the interior flesh should be underneath) Stretch with your hands and use the frame above the leather so it expands before we put the second mould. Make sure you practice beforehand which way you assemble your moulds.
- If you want the positive pattern, make sure you position the flesh side on the negative mould
- Place the negative part of the mould and tighten it with clamps (ideally 4 clamps for 4 corners) or table clamps.
- Let your mould with the leather fully dry overnight. You can use a hot air gun to accelerate the process.
- The sewing part can be an extension of this activity to obtain a finished piece such as a bag, pouch or wallet
Safety rules & Tips
- During the leather moulding, be careful with the hot water when putting the leather in the tub to not burn oneself.
- Careful with the heat gun for very hot air that can burn.
- When using the CNC milling machine wear eye protection and glasses.. ( need to find correct terminology)
Flyer for participants
Estimated cost
Always consider to find local providers.
| Item | Quantity | Link to vendor |
|---|---|---|
| Leather | 8 | Kupfer Cuir SA (Local leather company) Price depends by country or from university |
| MDF | A5 x 10 H: 10mm | DIY local store |
| Wood lacquer | 1 tub | DIY local store |
| Brushes | 8 | local store |
| Plywood | A4 x 5 H: 4mm | DIY Local store |
| Clamps | 16(Ideally 4 for each mould) | DIY Local store |
| Heat gun | 1-2 | DIY Local store |
| Leather sewing machine (optional) | 1-2 | www.amazon.fr |
| Needle | 8(1 for each person) | Local store |
| Thread | Enough to sew the bags (8 spools - 1 for each person min) | Local store |
| paper | 1 pack of A4 | Local store |
Evaluation Criteria
The students were graded by their tutor and by the Lab. There were only two grades passed and failed. This grading system was decided by the tutor of la HEAD. There is ECTS but each university, each course and each module is different. In this case this week was part of the module Fashion and New technologies week and the student needed to do at least 30 hours which represent 1 credit.
Additionally we used zine as a form of evaluation of each day. We gave them a presentation:
Tips to facilitate the activity in context (to-do / not do)
-
To do: Practice yourself to test the variables give yourself loads of time for the leather to dry. We observed that the leathers that stayed in their moulds a whole night had a better print effect that those that were done in few hours give time for the CNC to carve Show them an example of the zine
-
Not to do: Don't teach them everything, there isn’t enough time. only the tools that they will be needing. Unless they are really quick to understand and finish the assignment early. Don’t let them decide when to do their evaluation (zines) otherwise they won’t do it at all.
References
Links to photos and recorded materials
Files
CNC - my example of pattern - 4 examples of the students
Laser - frame
Document-Activity sheet
References and further reading
Related and supporting activities/modules
Licence and credits

Attribution — ShareAlike CC BY-SA This activity has been designed by Shannon Sykes from Onl’fait for shemakes.eu. It is based on the Textile Scaffold week of Fabricademy and alumni’s Jean Marie Durney local practice.
Related and supporting activities/modules
It can be combined with the other topics of Topic/skills, part of ...